Introduction
To ensure a smooth workflow and easy accessibility when working with web content, you need to manage your HTML files efficiently on different platforms. Also, you can use more time on code by efficiently saving time on file management in your development process. Thus, this blog gives you a comprehensive step-by-step guide on how to save HTML files across Ubuntu, Windows, Mac, iPhone, Android, and different web browsers regardless of your technical expertise. It is easy to save an HTML file and you need not be a tech expert for the same. However, the methods to save across different devices or platforms are different. By the end of this blog, you will be easily able to find a method that works for you for the device or platform you are using.
Related: What is HTML?
How to Save HTML Files on a Desktop
Let us now get into the specifics of how to save a file as HTML in a desktop environment. This section covers various methods as per different operating systems and basic text editors under Ubuntu, Windows, or Mac.
How to Save a File as HTML in Ubuntu
If you are working on Ubuntu, you can use simple text editors such as Gedit or more advanced ones (VS Code) or command-line tools such as Vim or Nano in the terminal. All three methods are described below for the procedure to save and open an HTML file:
Using Gedit
Gedit is an extensively used GUI text editor for the GNOME desktop environment. It is a default one in the Ubuntu operating system. You can follow the below steps on how to save an HTML file in Gedit:
- Find Gedit from the application menu or open it using the terminal with the below command line.
gedit
- Write your HTML code in the editor. You can create a new file or open your existing file – go to File > Open.
- Go to the File > Save or Save As Option. Further, choose the directory where you want to save or create one if you want, and type ‘filename’ with the .html extension (abc.html) to save a document as an HTML File.
Another method is to open the file directly is to type the below command in the terminal. Then, make the required changes. After that, you can press Ctrl+S to save the file.
gedit abc.html
Note: abc is the example file name, you need to replace it with the name of your file.
You can also open multiple files with the below command and select File >Save All or press Ctrl+Shift+L to save all open files.
gedit abc1.html abc2.html
Note: abc1 and abc2 are the example file names, replace them with the name of your file.
Save HTML file in VS Code
VS code is a source-code editor for software and web development from Microsoft. It has a lot of features and customization options such as smart code completion, built-in Git version control, and a huge extensions library. Also, it is open-source.
- Open VS code from the application menu or terminal (run ‘code’). You can install it through the official website.
- Create a new file (Go to File > New File or use the shortcut Ctrl+N) or open an already created one (File > Open File or Ctrl+O). You can also open using the below command line.
code abc.html
- Now, go to File > Save/Save As option.
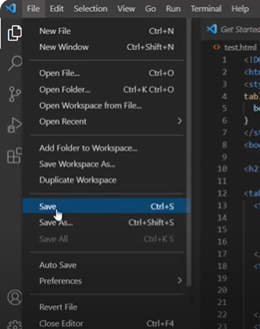
- Choose the directory where you want to save the file or create one and give your file a name.
- Save it with .html type & extension (Example file name – abc.html). Click on ‘Save’.

Alternatively,
- Directly open the required file in the terminal (Type code abc.html), make the required changes, and press Ctrl+S to save HTML Document.
Note: abc is the example file name, replace it with the name of your file.
(Similarly, use ‘code abc1.html abc2.html’ for multiple files. Then, Click on File > Save All or press Ctrl + K followed by S to save all open files. Note: abc1 and abc2 are the file names, replace them with the name of your file.)
Moreover, you can use the ‘Auto Save’ option from the File menu. (Go to File > Preferences > Settings to customize its settings.)
Create and save HTML files with Vim
- Open the file in Vim using the below command.
vim abc.html
(Note: you can install Vim using ‘sudo apt install vim command’.)
- Press ‘i’ to switch to insert mode.
![]()
- Further, start editing the file.
- So, how to save HTML file in Vim? Press ‘Esc’ to come out of the insert mode, type ‘:w’, and press ‘Enter’. Further, if you want to change the file’s name, type `:w newfilename.html’.
![]()
- If you want to exit Vim type ‘:wq’ instead of ‘:w’.
![]()
Create and save HTML files with Nano
- Use the below command to open the file in Nano and start editing the same.
nano abc.html
- How to save the HTML file in Nano?
- Ctrl+O and Enter (this confirms the file name)
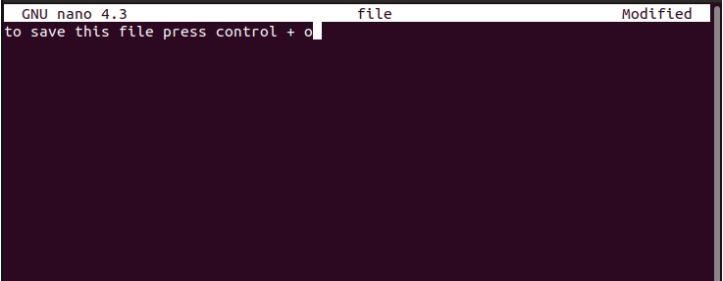
- Ctrl+X and press the Y key (this confirms the save option and exits).
(Note: If you want to change the file name, type the same after pressing Ctrl+O)
Saving a Document as an HTML File in Windows
It is easy to create and save HTML files in Windows with several text editors. You can choose one as per the complexities and user preferences. We shall cover the major ones, i.e. how to save HTML file in Notepad, Notepad++, and VS code.
How to Save HTML File in Notepad Text Editor?
Notepad is a pre-installed simple text editor that comes with Windows. It is easy to save an HTML document with the same. Go through the below steps to open and save the file:
- Search and Open Notepad from the ‘Start’ Menu and write your code (see the example below) to create and save the HTML file.
<!DOCTYPE html>
<html>
<head>
<title>Cantech Testing Page</title>
</head>
<body>
<h1>Cantech123</h1>
</body>
</html>
- Next, save the file from the File>Save As option or by pressing Ctrl+S.
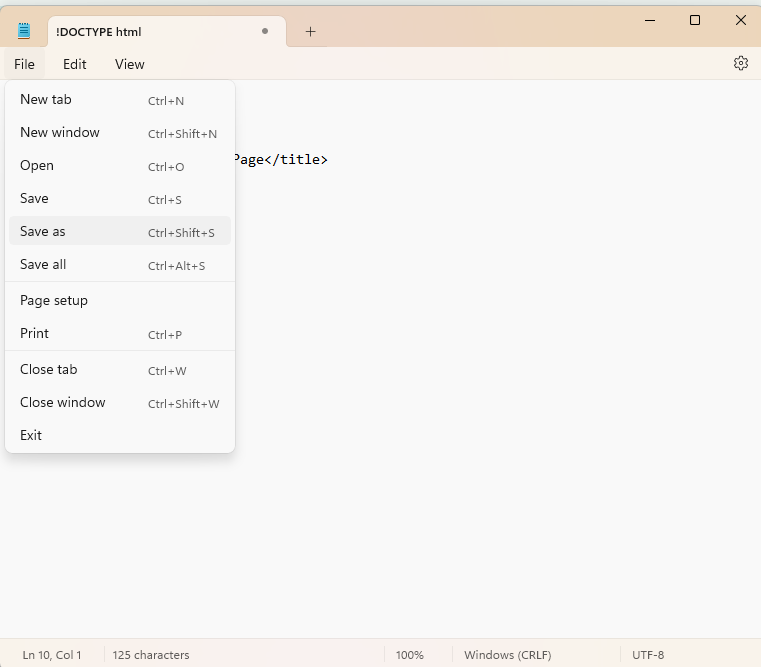
- Select ‘All files’ from the ‘Save as type’ in the dialog box. Also, choose the location or create a folder in your preferred directory where you would like to save the file.

- Enter your chosen file name with the .html extension and UTF-8 encoding, for example, abc.html, and click on the Save button.

Later, you can go to the location where you saved it and open it with a double-click. Other methods to open the file are to press Ctrl+O or go to File > Open Menu.
Use Other Code Editors for Writing HTML Code
VSCode, Notepad++, and Sublime Text are other code editors with additional features such as ‘Auto-complete code’. It recommends the words when you are working on the code. Also, it highlights the mistakes in spelling or any other errors in the words.
These editors also allow to run the code directly. Moreover, you also get syntax highlighting along with the color theme options for better readability. Further, they also make it possible to sync GitHub or any other code platforms to share and collaborate over the code.
Procedure to Save and Open an HTML File Using Notepad++
Notepad++ is an advanced version of Notepad with more features such as syntax highlighting and plugins. It is open-source too.
- Notepad++ is available from its official website. You can download it from there. Further, you can Open it from the ‘Start’ menu or Desktop shortcut and start working on it.
- First, write the code (see the example below).
<!DOCTYPE html>
<html>
<head>
<title>Cantech Testing Page</title>
</head>
<body>
<h1>Cantech123</h1>
</body>
</html>
- Methods of Saving an HTML Document.
- Go to File>Save As or press Ctrl+Shift+S/Ctrl+S and type the file name that you want to keep with the .html extension (For example, abc.html).
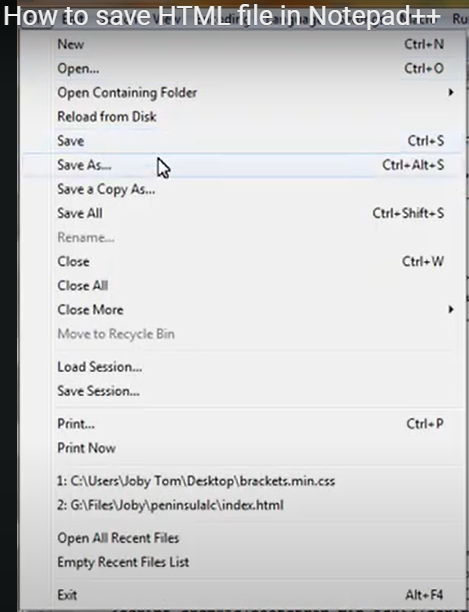
- You can also choose the ‘Export to HTML’ option from Plugins. Go to Plugins > NppExport > Export to HTML. Later, choose the location where you want to save and type the file name that you would like to keep with the .html extension. Click on ‘Save’. This option of saving the file is useful because it gives a well-formatted and structured HTML code.
(You can open your saved file in the browser by double-clicking on it inside its saved location. Alternatively, open Notepad++, go to File > Open, and select the file from the dialog box.)
Save File Using VS Code
Know the step-by-step procedure to save and open an HTML file in VS Code on Windows:
- Open VS Code and press Ctrl+N for a new file. Write your HTML code. (see the example for the code below)
<!DOCTYPE html>
<html>
<head>
<title>Cantech Testing Page</title>
</head>
<body>
<h1>Cantech123</h1>
</body>
</html>
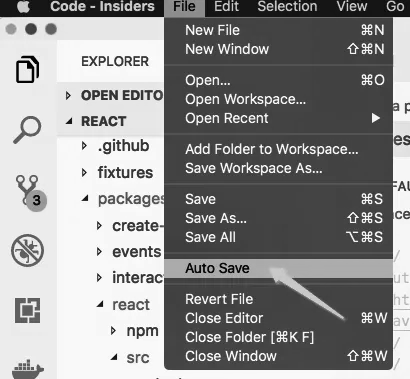
- You can then save it from the menu File > Save As. Enter the file name that you would like to keep with the .html/htm extension such as abc.html. Then, click on Save.
(You can also save the file using the File > ‘Auto Save’ Option to let your ongoing work save automatically at regular intervals. Also, you can save multiple open files from the File > Save All option.)
How to Save HTML File on Mac?
As per your expertise and preferences, you can choose to work on an HTML file using different approaches on Mac. Here we will discuss steps on how to save as an HTML file on TextEdit, Sublime, and VS code.
Steps to Save HTML page on TextEdit
MacOS has a built-in text editor known as TextEdit. It is a useful tool that can help you view your HTML code in the Visual mode while working on the editing mode. See the below steps on how to save an HTML file using it.
- You will find the TextEdit from the Applications folder or through the Spotlight i.e. Cmd+Space.
- Then, create a new file by selecting the ‘New’ Option from the File Menu.
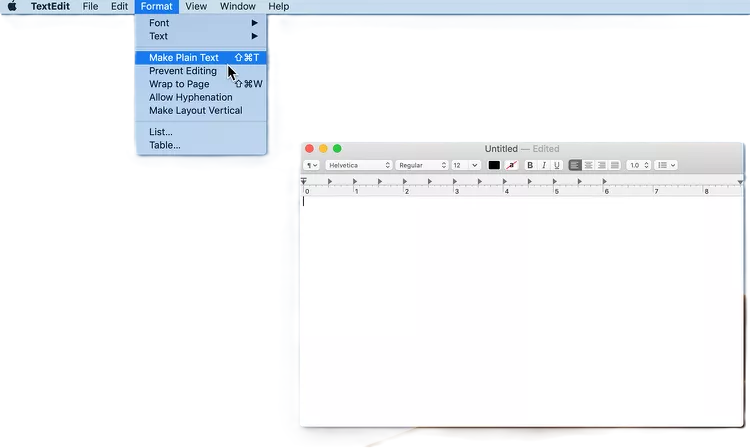
- Shift to the Plain Text mode from the Rich Text Mode from the Format menu (this is required to write the code correctly).
- Then, start coding. (See the below example)
<!DOCTYPE html>
<html>
<head>
<title>Cantech Testing Page</title>
</head>
<body>
<h1>Cantech123</h1>
</body>
</html>
- Now, you can go ahead and save the file from Menu File > Save As. Choose the location in the dialog box. Type the desired name with a .html/htm extension, for example, index.htm. Click on Save.

You can open the file from the Menus File > Open. To view it as a document select the file from the directory in the Open dialog box. You can also view it in code-editing mode from the ‘Show Options’ in the dialog box. You need to select the ‘Ignore rich text commands’ checkbox for the same (this option will prevent the code from showing in the formatted text i.e. code is not visible when you open the file).
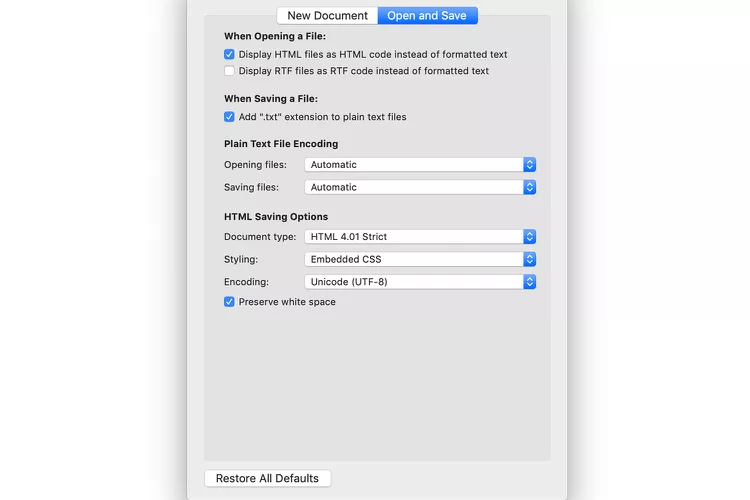
Moreover, if you want to save and open it in the code display, go to Preferences in TextEdit, click on the tab ‘Open and Save’, and check ‘Display HTML files as HTML code instead of formatted text’.
Other options for HTML saving configurations under the tab ‘Open and Save’ to prevent the code from showing in the formatted text are as below:
- Choosing Document Type from HTML 4.01 or XHTML 1.0.
- Choosing CSS Style from inline styles or to link to an external stylesheet.
- Selecting the character encoding (e.g., UTF-8).
- Preserve White Space i.e. to maintain the blank area formatting in code.
How to save a file in HTML in Sublime Text?
Sublime Text is a speedy and flexible text editor with a lot of advanced features. It is very much preferred by the developers as it makes the coding easier. You can save an HTML file using Sublime Text on a Mac easily, see the steps below:
- Using the applications folder or the Spotlight (Cmd+Space), open the Sublime Text.
- Start with the new file from File Menu > New File.
- Now, to save it you can again go to File Menu and click on ‘Save’. Choose the file location, enter your desired name with the .html/htm extension (Example, abc.html), and click on ‘Save’.
VS Code to save the HTML file on the Mac
Check the steps below on how to save the HTML file using VS Code on a Mac:
- First, open VS Code from the Applications folder or Spotlight (Cmd+Space).
- Create the file (File > New File) and type your code.
- Go to the File menu and choose Save / Save As Option.
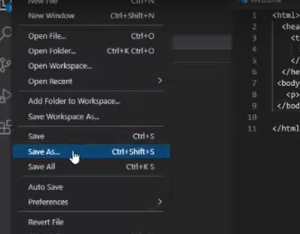
- Further, choose the location where you would like to save the File and then type the name of the file followed by the .html extension (Example, abc.html). Then, click on Save.
(Always ensure that you set the character encoding (e.g., UTF-8) when you save the HTML files to avoid the character encoding issues)
Also Read: How To Increase Button Size in HTML Easily?
How to Save HTML File in Mobile
A Developer or Project Manager can save HTML file in mobile and can manage your projects on the go. Thus, if you are just starting, here’s how to create and save your first HTML file on iPhone, Android, and iPad devices.
Saving the File on the iPhone
iPhone users can edit and save HTML files using several options:
Using Textastic
Textastic is known to be an efficient code editor with syntax highlighting and smooth file management.
- Open the App Store to install Textastic and start creating an HTML File by tapping the ‘+’ button and entering your code. Or, you can navigate to the existing file and open the same from the file browser icon.
- Now, to save the file tap on the ‘Share’ button and ‘Save to Files’. Choose the location where you want your file, enter the file name with the .html extension, and tap on ‘Save’.
Using Koder
You can create and save HTML files on Koder. It is also an app like Textastic that can save files directly on your iPhone. The steps are similar to the Textastic app.
- Open the App Store to install Koder and launch the same. Then, get started with the new file by tapping the ‘+’ button on the file browser icon. Enter your code. (see the below example)
<!DOCTYPE html>
<html lang=”en”>
<head>
<meta charset=”UTF-8″>
<meta name=”viewport” content=”width=device-width, initial-scale=1.0″>
<title>My Cantech Page</title>
</head>
<body>
<h1>Testing1</h1>
</body>
</html>
- Now, tap on the ‘Save’ icon, choose the file location, and tap on the ‘Save As’ after entering the file name. Do not forget the ‘html’ extension.
Using Files App
It is easy and convenient to save and organize HTML files using this iPhone app offering basic file management capabilities. Below are the steps for the same:
- Go to the installed Files app

- Then go to the location of saving an HTML document i.e. iCloud Drive or On My iPhone.
- Create the new file by tapping the ‘+’ button or you can drag and drop an existing HTML file into the Files app. If you have a file in the app, you can tap on it to view or edit it with Textastic or Koder.
How to Save a File as HTML in Android?
The Google Play Store provides different code editors that can create, edit, and save HTML files. Some are discussed below:
Save a Document in HTML Format in DroidEdit
DroidEdit is a code editor on Android devices. It is versatile and offers various features such as syntax highlighting. Also, it supports different programming languages. To save an HTML file, check the following steps:
- Download the app from the Google Play Store and open it. You can get started with the new file or navigate to the existing HTML doc file.
- Now, select Save As from the menu i.e. three vertical dots. Choose the location where you want your file and name it with the.html extension. Finally, tap on ‘Save’.
Saving the HTML File Using AIDE
AIDE (Android IDE) supports various languages including HTML. It is another popular development environment for Android. See the below steps for how to save an HTML file:
- Go to the Play Store and install the app. Start editing the new or existing file inside the app.
- Once you are done with your project, tap on the ‘Save’ icon. Then, save the file in your chosen location with the file name and .html extension.
Note: With DroidEdit and AIDE, you can save HTML files to your device’s local storage in your preferred folders or popular cloud services like Google Drive or Dropbox. If you prefer the cloud service, integrate the same with the file management app that you use. This way you can access your file across multiple devices.
Using iPad to Save An HTML File
Saving an HTML file on an iPad is similar to an iPhone. They both have similar apps but iPad has additional capabilities for syncing with cloud services. Let’s discuss Textastic, Koder, and cloud syncing services.
Using Textastic
You can download and install Textastic on an iPad App Store and get the same functionality as on an iPhone for editing and saving HTML files.
- Tap on the ‘+’ button in the app and start HTML coding in the new file. If you already have a file that you want to work on, navigate to the same from the file browser icon and start working on it.
- Tap on the ‘Share’ button and then on ‘Save to Files’
- Choose the file location and ‘Save’ it with the file name and .html extension.
Using Koder
Koder is a convenient way to create, save, and manage files on iPad too. Let us check out the steps for saving your HTML files:
- Get Koder from the App Store and create or open the file. (Tap ‘+’ to create a new file or navigate through the file browser icon to work on an existing one)

- Tap the ‘Save’ icon, choose the file location, and save it with the file name and .html extension.

Note: iCloud Drive, Google Drive, Dropbox, etc. are some cloud storage solutions. You can use them on the iPad to sync your HTML files across devices and access them from anywhere. You can access your cloud files from any device that is connected to your account. It helps with collaboration and increased productivity. However, make sure that it is integrated with the Files app on your iPad for smooth syncing and file management.
How to Save HTML Files Using Various Web Browsers
Web developers and other users save their HTML files using web browsers. They save HTML files online and easily archive and analyze their web content using different browsers and simple saving options to more advanced developer tools.
Step to Save HTML File in Chrome
Google Chrome can provide a simple HTML file or complete webpage with all the resources with its multiple ways of saving the file:
Save Page As (HTML Only vs. Complete Webpage)
- Open the webpage and right-click on it.
- Choose the ‘Save as…’ option.

- In the dialog box, under the ‘Save as type’ dropdown choose ‘Webpage, HTML only’ or ‘Webpage, Complete’.

- Type your new file name. Click on ‘Save’ after choosing the location or create a folder in your preferred directory where you want to save the file.
Using Developer Tools
- Pressing ‘Ctrl+Shift+I’ opens the Developer Tools in Windows/Linux. ‘Cmd+Option+I’ opens it on the Mac device.
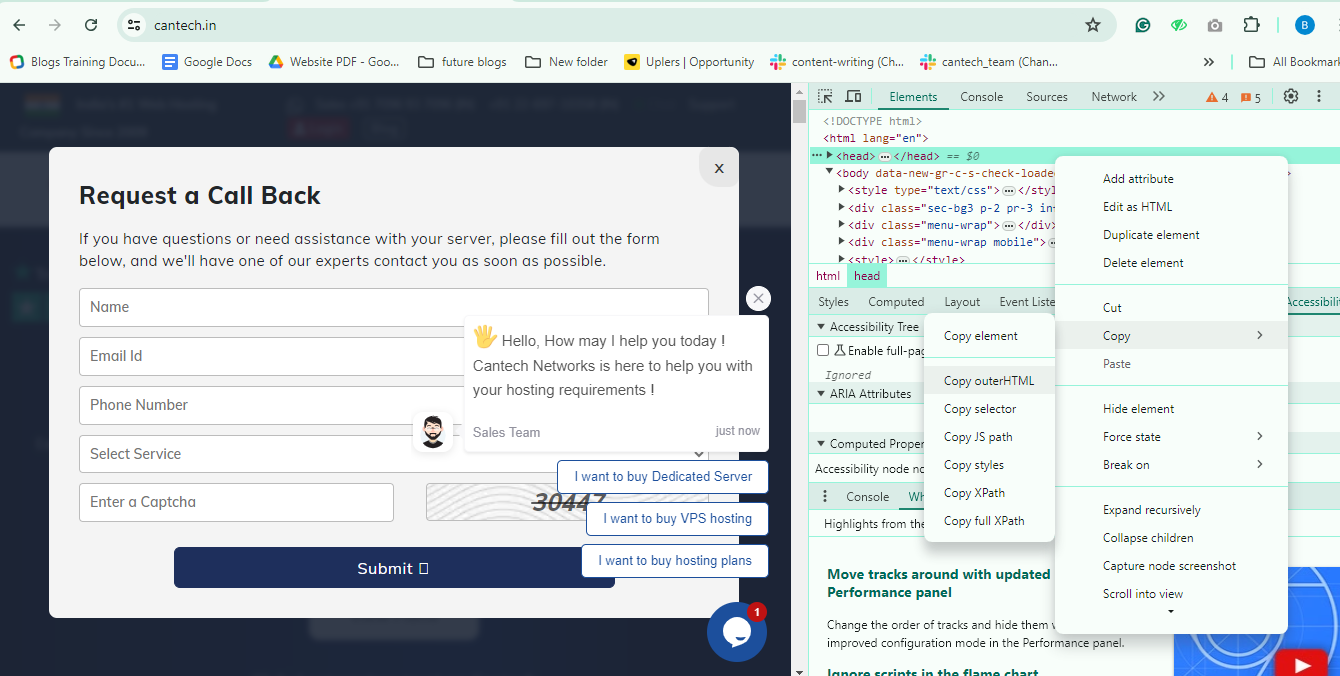
- Then, right-click under the Tab ‘Elements’ > HTML, and click on Copy > Copy outerHTML. Paste it using your preferred text editor and save it using the steps discussed before with the .html extension.
Recommended Extensions
Below are some of the extensions that you can use to save the web page as an HTML document in the Chrome Browser:
- Save Page WE
Get the ‘Save Page WE’ extension by installing it from the Chrome Web Store. Then, go to the web page that you would like to save and click on the extension icon. After that, click on ‘Save Complete Page’.
- SingleFile
Get this extension from the Chrome Web Store and go to the web page to save. Click on the extension icon and wait while the page processes and a dialog box appears. Then, choose the location to save the file or create a folder in your preferred directory, name the file, and then click on the ‘Save’ button.
- Save Rendered HTML
Install the extension and click on its icon when you are on the web page that you would like to save. It will prompt you to download the rendered HTML. So, you choose the location for the file and type the file name, then click on the ‘Save’ button.
- Web ScrapBook
Install the Web ScrapBook extension and click on its icon when you are on the web page. Choose ‘Capture Page’.
How to save a web page in HTML format in Firefox
Firefox has various methods similar to Chrome to save HTML files. You can use the built-in options and useful add-ons for enhanced functionality.
Save Page As Options (HTML Only vs. Complete Webpage)
- In the Firefox browser, open the webpage. Then, right-click on it and choose the ‘Save Page As…’ option.

- You will see the ‘Save as type’ dropdown menu, select ‘Web Page, HTML only’ or ‘Web Page, Complete’ in it.
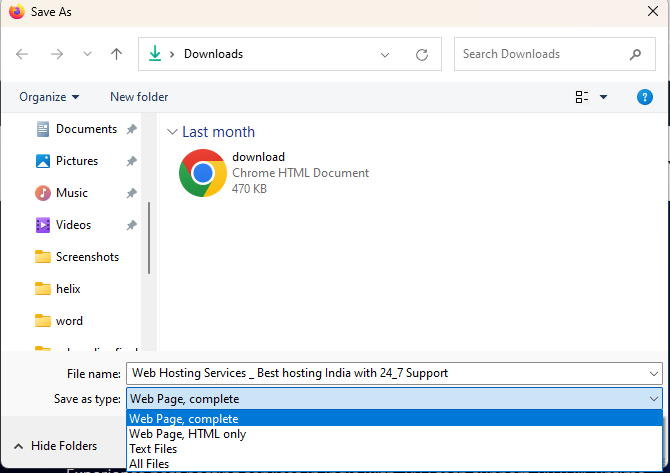
- After you choose the location and enter the file name, click on the ‘Save’ button.
Save the HTML File using the Developer Tools
- Developer Tools in Firefox Browser opens with Ctrl+Shift+I in Windows/Linux and Cmd+Option+I on Mac devices.
- When you right-click on the HTML element in the “Inspector” tab, you will see the ‘Edit as HTML’ option.
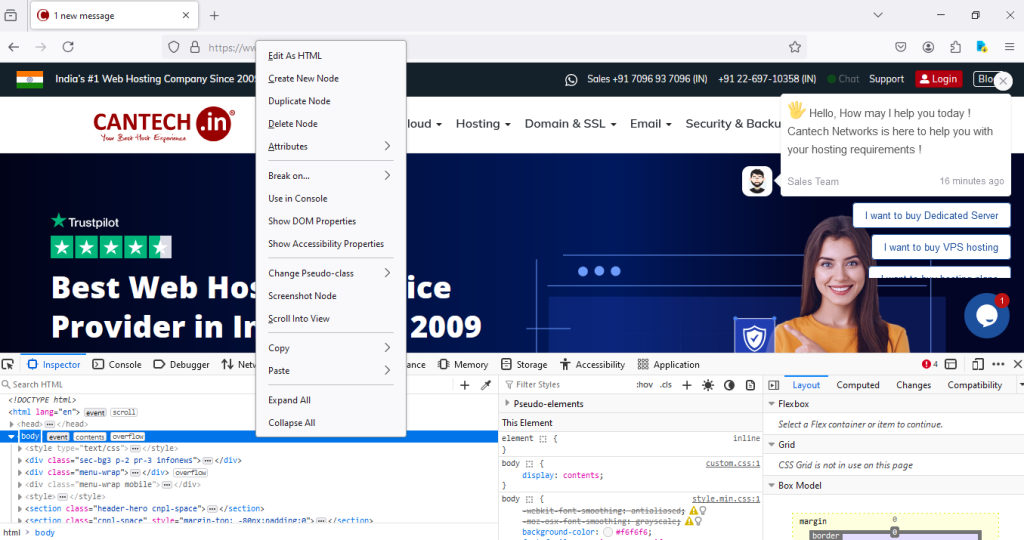
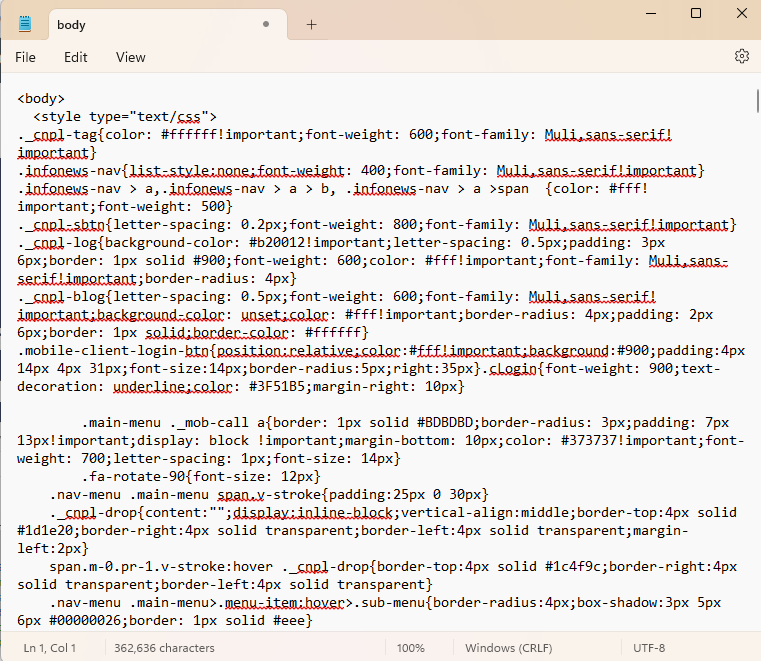
- So, select it, copy the content, and paste it into a text editor. Further, save that text editor file with a .html extension following the steps to save the same.

Recommended Add-ons
- Save Page WE
Get this add-on from the Firefox Add-ons site or simply search it via the search engine. Then, click on its icon when you are on the web page and ‘Save’ it by clicking on ‘Save Complete Page’ - SingleFile
Get SingleFile from the Firefox Add-ons site or search it via the search engine. Go to the web page and click on the add-on’s icon to Save the web page. - Save tabs to HTML file
Install this add-on from the Firefox Add-ons site and click on the icon. Click on the tabs that you want to Save and then on the ‘Save’ button to download the HTML files of those selected tabs. - Auto Save HTML
Install this Addon and configure the setting for automatic saving preferences of HTML files. - SingleFileZ
Once you get this Add-on for saving an HTML file, go to the web page, click on the icon, and save it as a single, compressed HTML file.
Saving HTML File on Internet Explorer/Edge
Let us see how to save a web page in HTML format using the built-in options and developer tools in Internet Explorer/Edge browser:
Save Page As Methods (HTML Only vs. Complete Webpage)
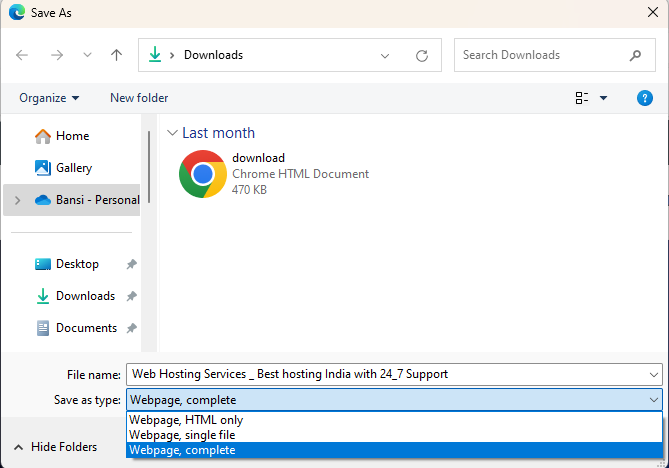
- Go to the web page and right-click on it to choose ‘Save as…’

- In the dialog box, choose ‘Webpage, HTML only’ or ‘Webpage, Complete’ from the “Save as type” dropdown menu. Also, choose the file location or create a folder in your preferred directory, type the file name, and click on the ‘Save’ button.
Using F12 Developer Tools
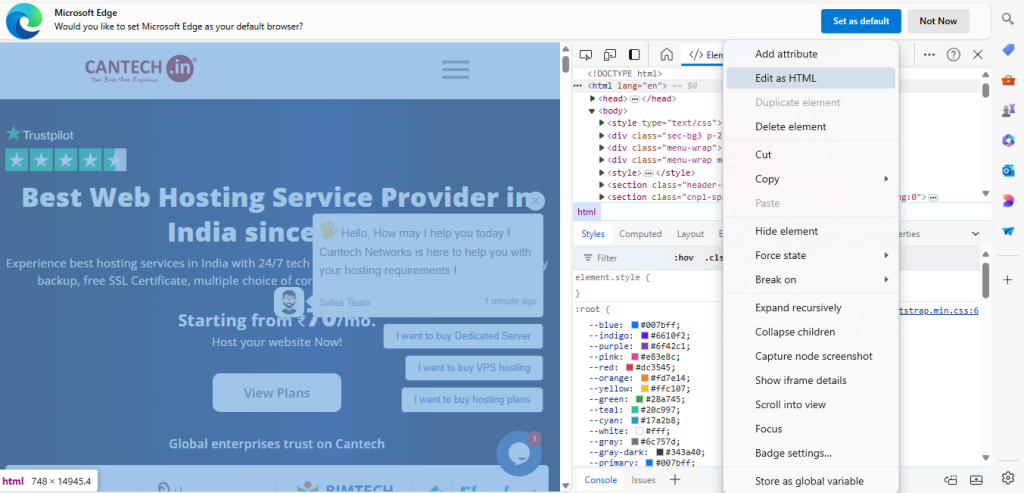
- F12 opens the Developer Tools in Internet Explorer/Edge. When you right-click on the HTML element in the ‘Elements’ tab, choose ‘Edit as HTML’.
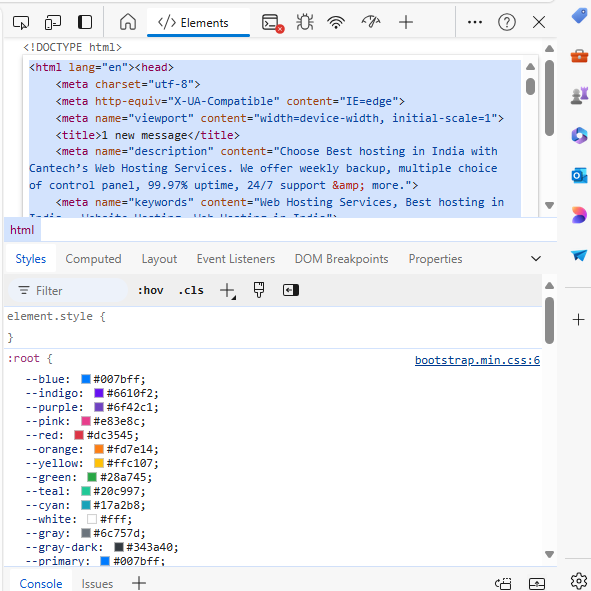
- Then, copy the content and paste it into a text editor of your choice.
- Further, save this file with the ‘.html’ extension.
Handling HTML Saving in Older Versions Internet Explorer
How to Save HTML Files in old versions of Internet Explorer? Well, visit the web page. Right-click on the same and choose the ‘Save As’ option. Choose the location or create one to save your file, enter the file name, and click the ‘Save’ button.
Alternatively, you can use F12 Developer Tools.
Also Read: How to Create Table in HTML?
Conclusion
This comprehensive guide on how to save HTML files across all types of devices and platforms helps you save them efficiently. After all, it is a fundamental skill to make your web development and browsing experience better. Thus, you can now choose different approaches that suit your workflow with the tools and techniques illustrated in this guide. Today, it is important to stay equipped across different devices to stay flexible and make your file accessible anywhere, anytime. Also, they help you stay well-organized and ready for any project. Focus on what truly matters i.e. coding and making your web content better.
FAQs
How do we save an HTML file?
You can save an HTML file using different methods across various devices and platforms. You need to open a text editor or an App. Create a new file or open an existing one. Enter your HTML code and save the file with a ‘.html/.htm’ extension on your computer (Example, abc.html). In your phone app, after you choose the file location, tap on the ‘Save’ option.
How to make an HTML File in Notepad?
Open Notepad from the Start Menu and write your HTML code. After you are done go to File menu > Save As option. Type the file name that you want to keep and add a .html extension to it. Select ‘All Files’ in the ‘Save as type’ dropdown and click on the Save button.
How to save as an HTML file in Notepad?
Open the ‘Notepad’ from the Start Menu of the Desktop and enter your code. Once you are done go to File > ’ Save’ or ‘Save As’ option. You can also use the shortcut Ctrl+S or Ctrl+Shift+S respectively. In the dialog box, choose “All Files” from the “Save as type” dropdown menu, also, choose the location or create a folder in your preferred directory for your file and save it with the .html extension in the file name (Example, abc.html).
How do I save an HTML file to Local Storage?
Below are the steps to save an HTML file to your local storage:
- Create or edit code in a text editor say Notepad.
- Once you are done editing, click on File menu > Save As sub-menu.
- In the location you choose in the dialog box, type the filename with a ‘.html’ extension (e.g., abc.html)
- Then select ‘All Files’ in the ‘Save as type’ dropdown option.
- Click ‘Save’.
How do I create an HTML file?
Choose your preferred phone coding app or desktop text editor. Launch it and start working on your code. Once you are done you can save it as per the respective methods with the .html extension.
How to save an HTML file in Word?
Open ‘Word’ from the Start Menu or Desktop Shortcut. Work on your HTML code in the Word. Then, choose the ‘File > Save As’ option. You will see the ‘Save as type’ dropdown in the dialog box, select ‘Web Page, Filtered’ in it. Then, choose or create a file location or create a folder in your preferred directory, type your preferred file name, and click on the ‘Save’ button.
How to save HTML files in Chrome from Notepad?
- Open Notepad from the Start Menu and write your HTML code.
- Once you are done editing and when you want to save the file go to File menu > Save As option.
- Type the file name that you want to keep and add a .html extension to it. Select ‘All Files’ in the ‘Save as type’ dropdown and click on the Save button.
- Then, open Chrome and press the Ctrl + O’ shortcut.
- Go to the file location where you saved your HTML file. Select the file and click ‘Open’.
- Your HTML file will open on Chrome.
- Right-click on it and choose the ‘Save as…’ option.
- Then, choose ‘Webpage, HTML only’ or ‘Webpage, Complete’ under the ‘Save as type’ dropdown.
- Type your new file name. Click on ‘Save’ after choosing the location or create a folder in your preferred directory where you want to save the file.
How do I save an HTML Page in Chrome?
Open the webpage and right-click anywhere on it. Choose ‘Save as…’. Select the location to save the file and choose ‘Webpage, HTML only’ or ‘Webpage, Complete’ under the ‘Save as type’, and click on ‘Save’. This will save the HTML page to your local storage.
How do I run an HTML file in Notepad?
Save your file by clicking on the menu File > ’ Save’ or ‘Save As’ option. You can also use the shortcut Ctrl+S or Ctrl+Shift+S respectively. In the dialog box, choose “All Files” from the “Save as type” dropdown menu, also, choose the location for your file or create a folder in your preferred directory and save it with the .html extension in the file name (Example, abc.html).
Open this saved file at the same location by double-clicking it and you can view it in a web browser.
If you want to view it in Notepad, press Ctrl+O or go to File > Open Menu. Choose ‘All Files’ from the dropdown where ‘text documents’ is displayed. You will see your saved file in the respective location. Select it and Open the same.
How to save HTML Code?
Open a text editor on your device like Notepad, Gedit, or VS Code and write your HTML code. Then, select the ‘Save As’ option from the ‘File’ menu. Further, choose the directory or location to save the file, and enter the preferred filename with the .html extension. Lastly, click on ‘Save’ to save the HTML code.
How to save HTML Code as File?
You can save HTML code as a file in your preferred text editor. Write the code and save it with a .html extension (File > Save As or Ctrl+S). Also, select ‘All Files’ in the ‘Save as type’ dropdown in Notepad.
How to save HTML Code in Notepad?
Write your code and choose the Save As option from the File Menu or simply press Ctrl+S on the keyboard. Save the file with the .html extension at your preferred location.
How to save source code in Notepad?
Paste or write the source code in the Notepad and Save it (File > Save As). Choose “All Files” from the “Save as type” dropdown menu, also, choose the location for your file and save it with the .html extension in the file name (Example, abc.html).
How to save HTML File Extensions?
.html extension is compulsory to add to your filename when saving a file on any platform or editor. For example, if your file name is abc, save it as abc.html. This extension helps web browsers to recognize and display the file as an HTML document. Thus, when you choose Save As from the File menu or press Ctrl+S, you choose the location to save the file and enter the file name with .html.


