Create a Streaming Server with OBS and Ubuntu
OBS Studio is a powerful open-source tool. It helps in streaming and recording videos smoothly.
Moreover, Ubuntu (a popular Linux operating system) works great with OBS. So, if you set up a streaming server with OBS on Ubuntu, especially on a Linux VPS, it gives you full control over your content. You do not need to depend on third-party platforms and get better privacy and customization.
This setup is useful for various purposes, such as gaming, live events, or educational content.
OBS and Ubuntu together give you a stable and reliable environment. Also, the right configuration can help you stream high-quality videos.
You need to prepare your Ubuntu system before setting up your streaming server. So, let us go through the prerequisites, starting with getting a fresh Ubuntu Server with good hardware on a server like Cantech.
Prerequisites
- Ensure you have at least 2 virtual CPUs, 4GB RAM, and 80GB storage for smooth performance. Also, a bandwidth of 3TB or more is recommended.
- Another essential aspect is SSH access (connect as a non-root user with sudo privileges). Moreover, you must install a desktop environment on your server.
Update Your Ubuntu System
With an updated operating system, you are guaranteed to get the latest features and important security patches installed on your server. It can offer a reliable basis to applications with high demands, such as OBS and Nginx. This makes your streaming server safe and running with no issues.
Keeping Your Server Current
sudo apt update command retrieves the latest package lists from your configured repositories. No new software or updates are installed here. It only refreshes the list of packages to can be updated. This will ensure that your system knows the existence of newer versions.
sudo apt upgrade command is the one that performs the actual installation of new versions for packages already installed on your system. It handles dependencies and makes sure that all the components are compatible. This command should be frequently run to implement security patches and performance enhancements.
To make both Commands efficient, you can use the && operator. First, you will update the package lists with sudo apt update and then upgrade all the outdated packages without confirmation with the help of the –y flag.
sudo apt update && sudo apt upgrade -y
Installation Steps for Nginx and RTMP Module
One of the most effective methods to have a stronger control over your live stream is to use a self-hosted Real-Time Messaging Protocol (RTMP) server. If you haven’t set up Nginx yet, refer our article on how to install Nginx web server on Ubuntu before proceeding. Nginx is a high-performance web server which is widely used for streaming and load balancing. It can be used together with the Nginx-RTMP-module to convert your Ubuntu server into a dedicated RTMP server. This allows you to stream your video to your server. After that, you can push that stream to several platforms, such as YouTube or Twitch, at the same time.
Installation of Prerequisites Packages
- Installation of Nginx:
The basic Nginx web server package should be installed first. This can be done using the standard Ubuntu repository command. This installation serves as the base functionality for the RTMP module.
sudo apt install nginx -y
- Installation of RTMP Module:
The Nginx RTMP module (libnginx-mod-rtmp) adds streaming capability to Nginx and doesn’t require manual source compilation on modern Ubuntu releases.
The Nginx-RTMP-module is typically found in the Ubuntu universe repository (from Ubuntu 20.04 onward). You may need to enable the universe repository first with sudo add-apt-repository universe. This is a separate package that needs to be installed to add the required streaming capabilities. The module will be used to add the RTMP directives to your Nginx configuration, and you will use this to control your stream.
sudo apt install libnginx-mod-rtmp -y
- Initialising the Service:
Once the installation is complete, you need to make sure the Nginx service has been started and it is set to be started when the system is booted up. This will ensure your streaming server is not offline.
sudo systemctl start nginx
sudo systemctl enable nginx
Steps to Configure Nginx for Streaming
The essence of setting up your RTMP server is configuring the Nginx service. You will need to edit a specific configuration file to tell Nginx how to handle the incoming video stream from OBS. This setup identifies the application name and defines the ‘live’ endpoint that OBS would use as a streaming target.
Edit Nginx Configuration File
The configuration files of Nginx are typically found in the directory /etc/nginx. Depending on the complexity of your setup, you will normally add your RTMP configuration block to a dedicated file or the main configuration file. To have a simple setup, you can edit the main configuration file, which is /etc/nginx/nginx.conf.
You have to place the complete RTMP configuration block outside and after the existing http { … } block in /etc/nginx/nginx.conf, ensuring there’s no syntax overlap. This block instructs Nginx to start listening to an RTMP stream. The default port on RTMP is 1935.
# Open the Nginx configuration file
sudo nano /etc/nginx/nginx.conf
# Add this block at the very end of the file, outside the http block
rtmp {
    server {
        listen 1935;  # Listen on standard RTMP port
        chunk_size 4096;

        application live {
            live on;
            # Optionally, enable recording:
            # record off;
        }
    }
}
- Application of Changes:
Once you have saved and closed the configuration file, you need to test the syntax of the configuration to check whether there are errors or not. After that, it is necessary to restart Nginx service to load the new settings. This would make sure the server is using your new RTMP configuration.
sudo nginx -t # Test configuration for syntax errors
sudo systemctl restart nginx # Apply and activate the updated configuration (use reload if you don’t want downtime)
At this point, your OBS Studio can stream to your Nginx RTMP server using the RTMP URL format: rtmp://<server_ip>/live, and the Stream Key can be any custom identifier (e.g., test or stream1).
Installation of OBS Studio on Ubuntu
Ubuntu makes it easy since OBS is available in its repositories.
- Install OBS Studio along with FFmpeg (a tool to handle multimedia files) –
sudo apt install ffmpeg obs-studio -y
Set up YouTube Stream
- Open ‘YouTube Studio’ (in case of YouTube streaming). Then, click
Createin the top right and choose ‘Go Live’. - Next, schedule your stream in the
Manage>Schedule Streamsection. Further, add a title, Description, and Category. - Also, upload a thumbnail if needed.
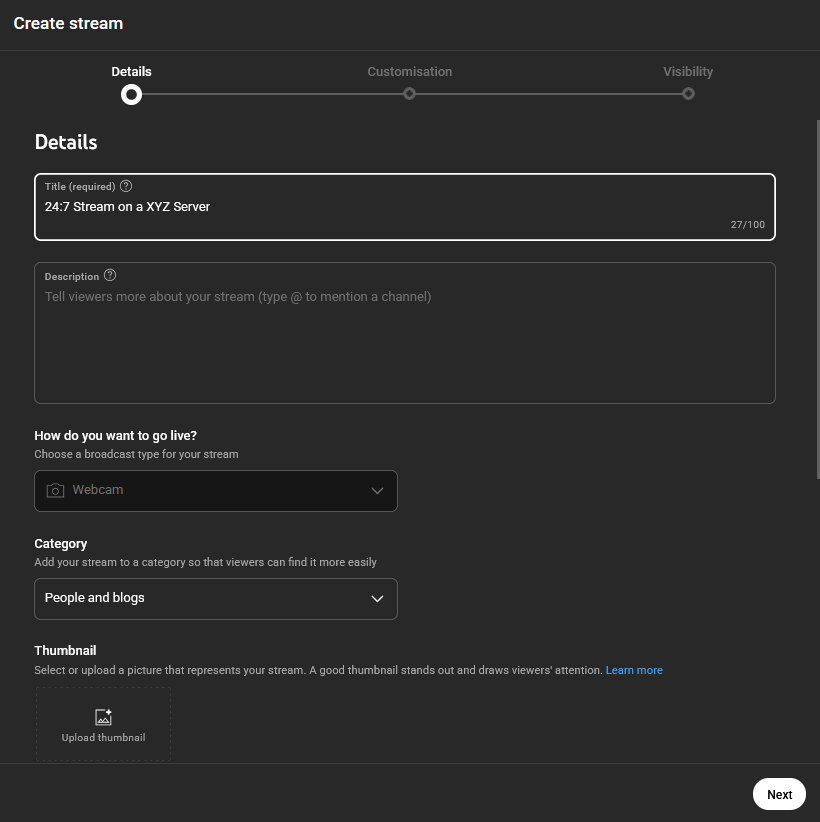
- Select your audience and other Customization options. Click on the
Nextbutton. - Stream visibility must be set to Public for the date you want to stream it. Lastly, click on the
Donebutton. - Ensure
Auto-Startis turned on in Stream Settings. - Copy the stream key (you will need it in OBS).
The process is similar if you are streaming on Twitch or other platforms. You simply need to find the stream key and RTMP URL from the respective platform’s settings.
Configure OBS Studio for Best Performance
You first need to access your Ubuntu server’s desktop remotely to access OBS. You can do this using software like VNC Viewer or NoMachine.
- Log in as a non-root user and open the
Applicationsmenu. - Next, look for
OBS Studioand launch the application (the Auto-Configuration wizard will pop up). You will want to select the “Optimize for streaming, and recording is secondary” option in the wizard. Then,Next - After that, click
Nextagain without changing the video settings. - Click on
YouTubeorYouTube Gamingfrom the list from the Service drop-down. - Now, paste your YouTube stream key into the provided field. Click on the
Nextbutton to test the optimal settings for your stream. - After the test ends, finalise by clicking on
Apply Settingsto close the wizard. - Next, click on the
Settingsoption (or you can navigate via File > Settings) within the OBS Studio interface. - Access the Video section to adjust both the base canvas and output resolution.
For 2 or more vCPUs on a server, it is advisable to use a resolution of 720p (1280x720). (Keep in mind that with the resolution and FPS higher, it needs higher processing power OBS)
- You also need to change the Common FPS Value to
30or higher (as per the quality of stream that you want). - Go to the Output section and adjust the video bitrate
Ensure the bitrate fits the stream resolution as per the recommended ranges listed below:
Resolution        FPS Value     Recommended Bitrate Range (Kbps)
---------------       --------------     ----------------------------------------------
852x480                30                  500 to 2000
1280x720              30                 1500 to 4500
1280x720              60                 2500 to 6500
1920x1080            30                 3000 to 6500
1920x1080            60                 4500 to 9500
3840x2160            30                 13000 to 34000
3840x2160            60                 20000 to 51000
- Click
Applyafter adjusting these settings. - Then, go to the
Advanced Section>Automatically Reconnectarea. - Set values as – Retry Delay – 3 seconds or less
- Set Maximum Retries – at least 1000.
- Click
OKto save and exit. - The
Studio Modeoption turns on both the Preview and Program screens. - Then, you can proceed with setting up the stream.
- Click on the
+symbol in the Sources section to add your video and audio sources. Also, verify that your sources are feeding properly. - Then, to move the content to the live program screen, click
Transition - Lastly, click the “Start Streaming” button.
- Open a web browser and go to your YouTube channel to check that the stream is live.
Keep monitoring the CPU usage rate in OBS while streaming. Above 90% means it may cause frame drops or buffering. You can fix this by lowering your output resolution or upgrading your server’s vCPUs.
- Finally, disconnect from the Ubuntu desktop, but keep your stream running. You can log back in anytime to check that OBS is working without any issues.
Set up a Self-hosted Stream Server like Owncast
- Deploy an Owncast server and launch a fresh Windows Server 2022 instance on Cantech. (OBS Studio works best on Windows, so you can install it on the latest Windows Server edition for a more stable experience.)
- Use RDP (Remote Desktop Protocol) and access the Windows Server.
- Both Ubuntu and Windows servers need to be within the same Cantech Virtual Private Cloud (VPC) for a secure and fast connection.
- Use the ping utility and test communication between the servers.
Installing and Configuring OBS on Windows Server
- Open a browser on your Windows Server, visit the official website and follow the installation prompts to download the OBS Studio installer.
- After the installation. Open it from the start menu. The auto-configuration wizard will open, and you will need to select
Optimize for streamingand proceed. - Choose
Customas the streaming service and enter the RTMP address for your Owncast server (e.g., rtmp://192.0.2.1/live). - Next, add the stream key and test the connection.
- Click
Apply Settingsafter the connection test is successful.
Now go to the Settings menu and adjust your video resolution and bitrate to match your desired stream quality. Go to the ‘Advanced’ section and set the retry delay to 3 seconds or less (follow the earlier steps).
Configuring Windows Server for Continuous Streaming
When you use Windows Server, your remote desktop session is counted as a single user session. So, when you disconnect it, the server might lock. This could stop your stream.
You can keep the server active by using the ‘tscon’ utility to send your RDP session to the console.
- Open the Command Prompt or PowerShell on the Windows Server.
- Use the following command to view your RDP session –
> qwinsta
- You can use the tscon tool to send your remote desktop connection to the console. This will keep everything running smoothly without interruption. To do this, type the following command:
> tscon rdp-tcp#2 /Dest:Console
- You run this, and your remote desktop connection will automatically close. However, OBS will continue to run. It will stay active until you log in again or make any changes to the server settings.
- Install TightVNC to monitor your Windows Server and adjust the console resolution. Connect to the VNC session when you have sent the remote desktop to the console. This way, you can keep track of your server’s performance.
You can always check the live stream by visiting your stream server’s URL. Make sure it is running smoothly.
https://mystream.example.com
Connect to your Windows Server using VNC in case of buffering during your stream. You need to check if the OBS CPU usage is under 90%. You can lower the resolution if it is high so that OBS consume fewer server resources and avoids buffering.
Conclusion
By installing a special streaming server using OBS Studio on Ubuntu, you have better control and flexibility over your content distribution. When self-hosting, you no longer need to face the limitations of third-party services. This arrangement is more customizable, private and can be stable to enable professional streaming. Regardless of whether you prefer the OBS-to-YouTube solution or an Nginx-RTMP solution, the open-source tools running on a powerful Linux server ensure to give you high-quality and reliable stream to your audience. It is important to keep your Ubuntu system up to date and properly set up OBS so that you can continuously stream at professional quality.
FAQs
Can I Use a VPS for YouTube Streaming?
Sure, a Virtual Private Server (VPS) can be used to stream on YouTube. A VPS offers dedicated resources, such as CPU and RAM. This is ideal to run a resource-intensive application such as OBS Studio to provide stable and continuous streaming as long as the VPS has sufficient bandwidth and processing power.
How to Record Screen on Linux?
The most common method of capturing your screen on Linux, and Ubuntu in particular, is by capturing it with OBS Studio itself. OBS is an excellent streaming as well as local recording tool. Other simple desktop environment tools, such as Kazam or the built-in screen recorder (usually triggered by Ctrl+Alt+Shift+R in GNOME), can also screen record.
How to Create a Media Server?
To build a media server, you can either install a dedicated media management software, such as Plex or Jellyfin, on your Ubuntu server. These software programs organise your video and audio files. They allow you to stream them to your local network or the internet to other devices such as smart TVs, phones, and computers.