WordPress Multisite: Setup Guide for Beginners
Managing many websites separately takes a lot of time. WordPress has a built-in feature to handle this problem. You can run many sites from just one dashboard.
What is WordPress Multisite?
This feature lets you create a network of websites under one WordPress installation. It works great for business branches or school projects. You use one set of login details for every site in your network.
Things You Need Before Starting
You must prepare a few things before you turn on this network mode. These steps keep your data safe and ensure a smooth setup.
Check Your Hosting Plan
Your hosting must allow multiple domains or subdomains. Some basic plans do not support this feature. You should check your current plan details first.
Clean Your WordPress Site
You must deactivate every active plugin before you start the process. This prevents errors during the installation. You can use a new site or an old one.
Get Admin Permissions
You need access to your website files. You will edit the core configuration files later. Make sure you have your FTP or File Manager login ready.
Create a Full Backup
Changes to core files can sometimes cause issues. You should save a full copy of your database. You should also save your website files.
Steps to Enable WordPress Multisite
The process involves editing files and changing dashboard settings. Please follow these steps carefully to build your network.
Step 1: Edit the wp-config file
You need to tell WordPress that you want the multisite option. This happens inside the main configuration file of your site.
- Connect to your server using an FTP client.
- Find the file named wp-config.php in your root folder.
- Paste into the files
define('WP_ALLOW_MULTISITE', true); - Place this line right above the “happy publishing” comment.
- Save the changes and upload the file back.
Step 2: Set Up Your Network
Now you will see new options inside your WordPress admin area. You need to decide how your site URLs will look.
- Log in to your WordPress dashboard.
- Go to the Tools menu and select Network Setup.
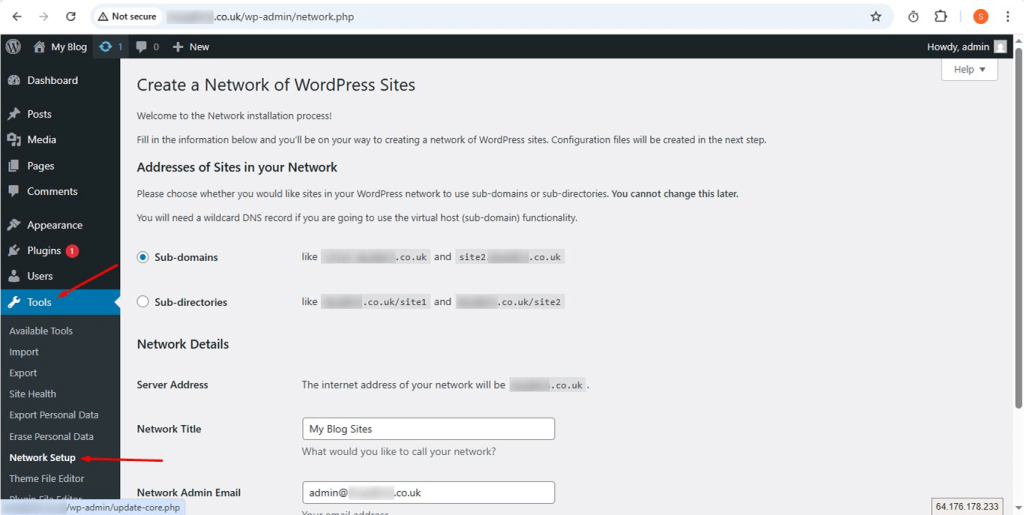
- Choose between subdomains or subdirectories for your sites.
- Enter your network name and your admin email address.
- Click the Install button to continue.
Step 3: Configure Wildcard DNS
This step is only for people who chose the subdomain option. It tells your server to recognize any new site name you create.
- Log in to your hosting control panel.
- Open your DNS Zone Editor tool.
- Add a new record with the name *.
- Point this record to the IP address of your server.
- Wait for the internet to update these settings.
Step 4: Add Final Code Snippets
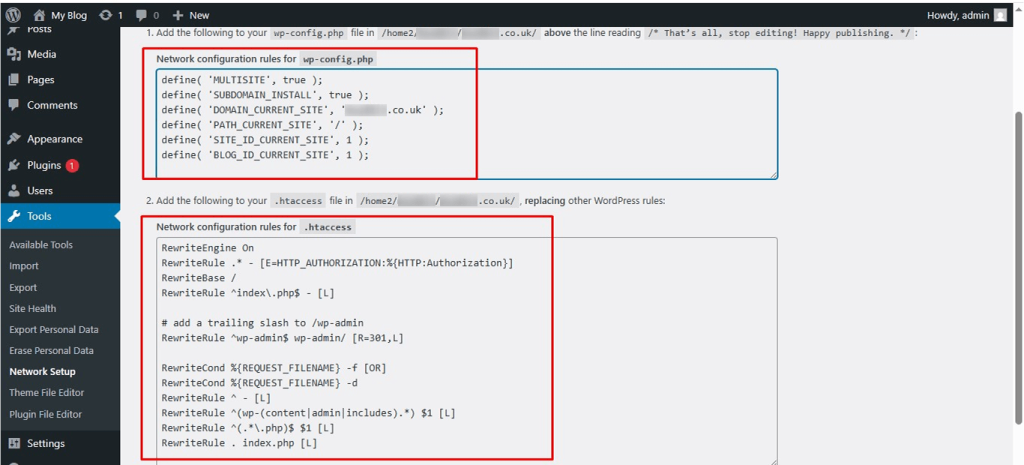
WordPress will give you two blocks of code after the installation. You must paste these into your site files.
- Open your wp-config.php file again.
- Paste the new code from your dashboard into this file.
- Open your .htaccess file in the same folder.
- Replace every line in that file with the new code from WordPress.
- Save both files and refresh your dashboard.
- (Replace yourdomain.com with your actual domain.)
Step 5: Adjust Network Settings
Your network is now live, but it needs specific rules. You can control how people use your new sites here.
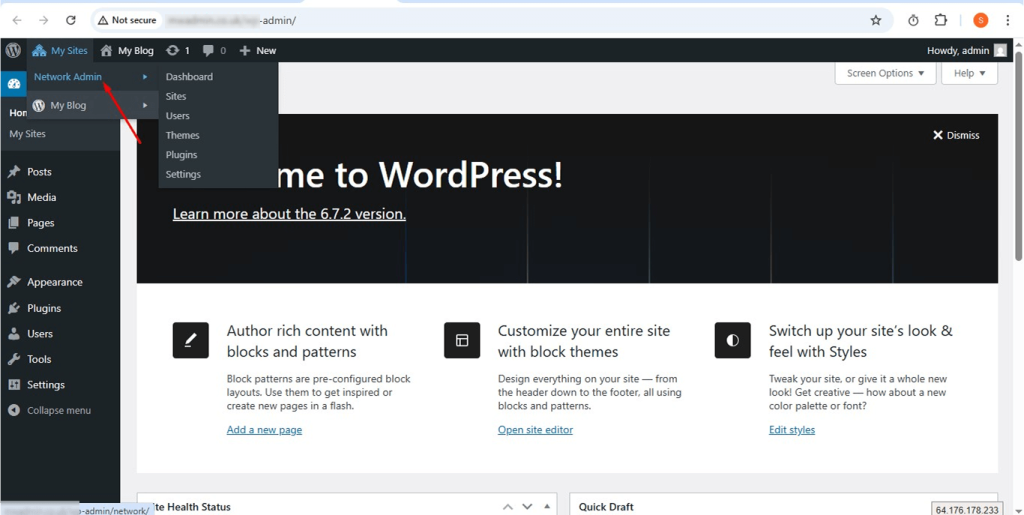
- Go to the My Sites menu at the top.
- Select Network Admin and then click Settings.
- Limit the total size of file uploads if you want.
- Choose if site admins can turn plugins on or off.
- Save your changes at the bottom of the page.
Step 6: Create New Sub-sites
You can now add as many sites as your hosting allows. Each site can have its own title and admin user.
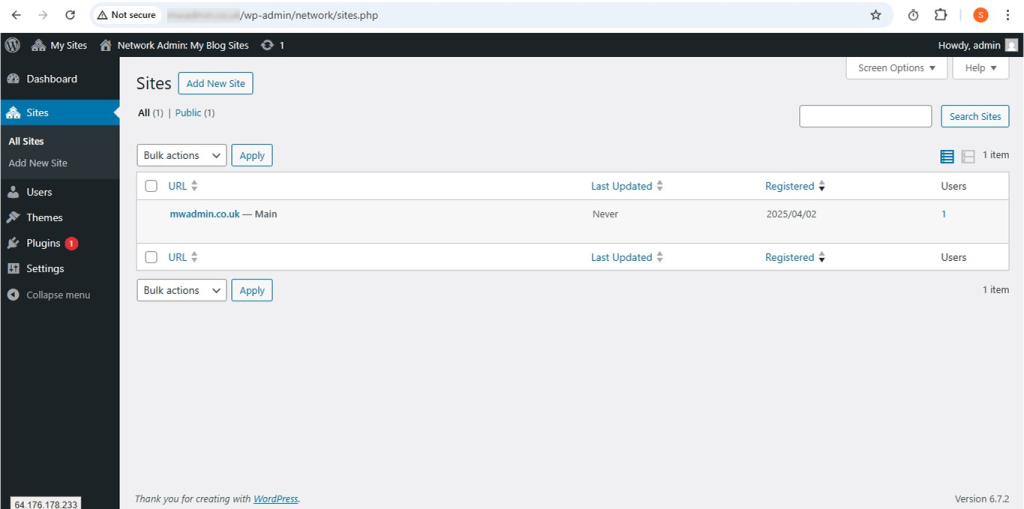
- Navigate to Sites under the Network Admin menu.
- Click the Add New button.
- Type the URL and the title for the new site.
- Enter the email address for the site owner.
- Click Add Site to finish the process.
Cantech WordPress Hosting
Cantech provides specialized servers for WordPress users. Our plans handle the high resource needs of a multisite network. You get fast speeds and strong security for every site in your list. Our team helps you with the technical setup if you face any trouble.
Conclusion
A WordPress Multisite network makes website management very simple. You save time on updates and plugin installs. Just follow the file edit steps carefully to avoid errors. You can now grow your online presence from one single place.
FAQs About Multisite
1. Can I use different themes for each WordPress Multisite?
Yes you can install many themes in the network admin. You then enable specific themes for specific sites. Each site can look totally different from the others.
2. Do all sites share the same plugins?
The network admin installs all the plugins. You can activate a plugin for the whole network at once. You can also let individual site owners choose their own plugins.
3. Is multisite good for my SEO?
Search engines see subdomains as different entities. Subdirectories pass the main domain authority to the new sites. Your choice depends on your specific marketing goals.
4. Can I change back to a single site later?
You can revert the changes by editing your files again. This process is very difficult and requires technical knowledge. You should decide carefully before you start a network.
5. Does a multisite network slow down my hosting?
One installation uses fewer resources than many separate ones. A very large network still needs a powerful server. Our Cantech plans provide the necessary power for large networks.
