How to Set up G Suite MX records in Plesk?
Because your emails must be routed through Google’s servers instead of your web host, configuring your G Suite (Now Google Workspace) MX records Plesk is essential. Though Plesk can be intimidating, it is fairly simple once you know which records to change.
Below is a straightforward outline for configuring your mail flow correctly.
Sign in to Plesk.
Navigate to DNS.
Check the boxes to eliminate the listed records.
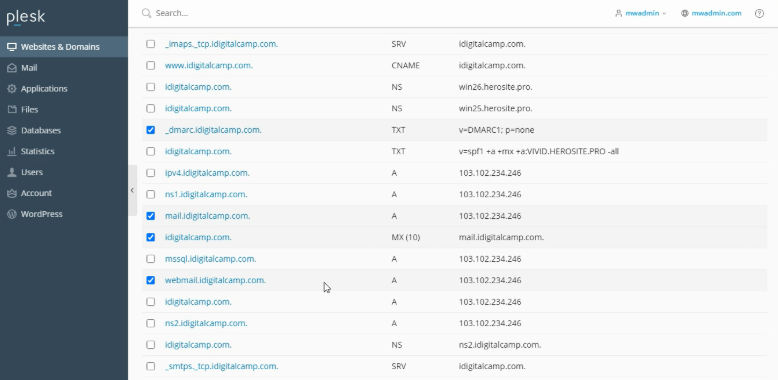
Important: You need to eliminate the MX record. However, to avoid conflicts, also eliminate the DMARC TXT, and the TXT (if any), and the A records for mail and webmail.
To add new MX records, click on Remove.
To reroute your email to your G Suite account, you will need to add these MX records to your domain.
Continuing on the same screen, select Add Record.
From the Record Type list, select MX.
Mail Domain can be left blank.
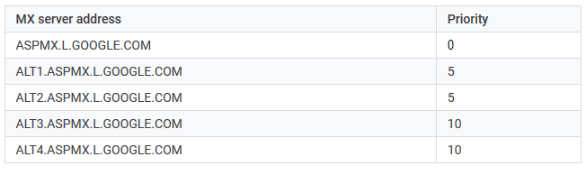
In the Mail exchange server field, enter this record (ASPMX.L.GOOGLE.COM)
For Specify the priority of the mail exchange server, select 1 for this record.
Click OK.
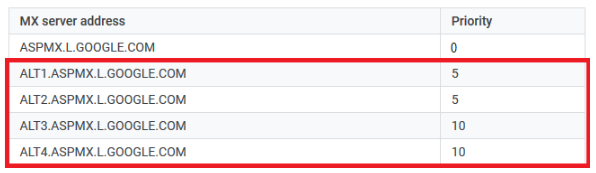
Repeat the same process to add the remaining MX records with their respective priorities.
After you have added all the MX records, click Update.
You will receive a success message.
You can now activate G Suite from the Google admin panel.
You have now learned to set up G Suite MX records in Plesk.
Conclusion
The final step in connecting your domain to the Google Workspace ecosystem is configuring MX records in Plesk. By prioritizing Google’s servers and turning off the local mail service, you create a hassle-free experience. The transition period lasts a few hours, so keep an eye on your Google Admin Console for the final update. When the status changes to “Active”, your setup is complete and you can explore Google’s communication tools.