How to Host a Joplin Server with Docker on Ubuntu?
Introduction
The Joplin self-hosted synchronization server for the note-taking application, offering complete control over the data. It facilitates users to easily sync their notes, notebooks, and attachments on multiple devices like desktop, mobile, and web without having to rely upon any third-party cloud services, such as Dropbox or Nextcloud.
Moreover, the Joplin server usually runs with PostgreSQL as the database and can easily be deployed online through Docker. Users access it through the Joplin client app by setting the sync target to the URL of their server.
Here, in this tutorial, we will guide you on how to install Joplin Server on your Ubuntu system using Docker.
Prerequisites
Before you can begin to host a Joplin server:
- Ensure you are in possession of the following system within your Ubuntu server (highly recommend version 22.04 or later)
- Non-root version with sudo permissions.
- Docker and Docker Compose are installed.
Have you installed Docker and Docker Compose? If not, then one can do with the following commands!
sudo apt update
sudo apt install -y docker.io docker-compose
Check the verification once it is installed.
docker --version
docker-compose --version
How to Host a Joplin Server with Docker on Ubuntu?
Here, we have prepared a stepwise guide to host a Joplin server with Docker on Ubuntu!
Step 1: Set Up Joplin Server with Docker Compose
To install Joplin server with Docker Compose, you require creating a directory for Joplin and the Docker Compose file.
- Create a new folder in the /opt directory to store the Joplin Docker files.
sudo mkdir -p /opt/joplin
- Navigate to the directory.
cd /opt/joplin
- Create the Docker Compose File:
sudo nano docker-compose.yml
- Insert the following content into the file.
The values 5434 and 22300 are sample values; you can modify them if needed.
Replace https://joplin.example.com with your actual fully qualified domain name.
Update the POSTGRES_PASSWORD, POSTGRES_DATABASE, and POSTGRES_USER values as per your preference.
version: '3'

services:
db:
image: postgres:13
volumes:
- ./data/postgres:/var/lib/postgresql/data
environment:
- POSTGRES_PASSWORD=your_password
- POSTGRES_USER=joplin
- POSTGRES_DB=joplin
restart: always
app:
image: joplin/server:latest
depends_on:
- db
ports:
- "22300:22300"
environment:
- APP_PORT=22300
- APP_BASE_URL=https://joplin.example.com
- DB_CLIENT=pg
- DB_HOST=db
- DB_PORT=5432
- DB_NAME=joplin
- DB_USER=joplin
- DB_PASSWORD=your_password

restart: always
This Docker Compose file sets up a Postgres database container and a Joplin Server operating on port 22300.
Make sure that you save the file and then exit.
- Start the Joplin Server
sudo docker-compose -f joplin-docker-compose.yml up -d
- Confirm that the Joplin Server is running properly.
sudo docker ps
You’ll get an output similar to the one shown below.
CONTAINER ID   IMAGE                    COMMAND                  STATUS          PORTS                      NAMES
a7f4b23c9a8d   joplin/server:latest     "docker-entrypoint.sh"   Up 30 seconds   0.0.0.0:22300->22300/tcp   joplin-app
b1e5d62f1a3b   postgres:13              "docker-entrypoint.sh"   Up 30 seconds   5432/tcp                   joplin-db
Step 2: Configure Nginx as a Reverse Proxy
- Install Nginx:
sudo apt install -y nginx
- Create Nginx Configuration for Joplin:
sudo nano /etc/nginx/sites-available/joplin
- Add the following content:
server {
listen 80;
server_name joplin.example.com;

location / {
proxy_pass http://127.0.0.1:22300;
proxy_set_header Host $host;
proxy_set_header X-Real-IP $remote_addr;
proxy_set_header X-Forwarded-For $proxy_add_x_forwarded_for;
proxy_set_header X-Forwarded-Proto $scheme;
}
}
- Enable the Configuration and Restart Nginx:
sudo ln -s /etc/nginx/sites-available/joplin /etc/nginx/sites-enabled/
- Check the Nginx syntax and test for any configuration errors.
sudo nginx -t
- Restart Nginx to apply the changes.
sudo systemctl restart nginx
Step 3: Configure the Firewall Security
By default, UFW is enabled on Ubuntu. Follow the steps below to set up the firewall for allowing HTTP and HTTPS access to your server.
- Allow HTTP traffic on port
80:
sudo ufw allow 80/tcp
- Allow HTTPS traffic on port
443:
sudo ufw allow 443/tcp
- Reload UFW to apply the new rules:
sudo ufw reload
Step 4: Secure the Server with Let’s Encrypt SSL
- Install Certbot:
sudo apt install -y certbot python3-certbot-nginx
- Obtain and Install SSL Certificate:
sudo certbot --nginx -d joplin.example.com
Follow the prompts to complete the SSL installation.
Step 5: Managing Joplin Server
1. Open your web browser and visit your subdomain to check if the Joplin Server is working:
https://joplin.example.com
2. Log in using the default credentials:
- Email:
admin@localhost - Password:
admin
3. Next, click your username (Admin) at the top-right corner of the page.
4. Update your Administrator profile by adding your Full Name, Email, and setting a strong password for better security. Then click Update Profile to save the changes.
5. After that, click Admin in the top navigation menu.
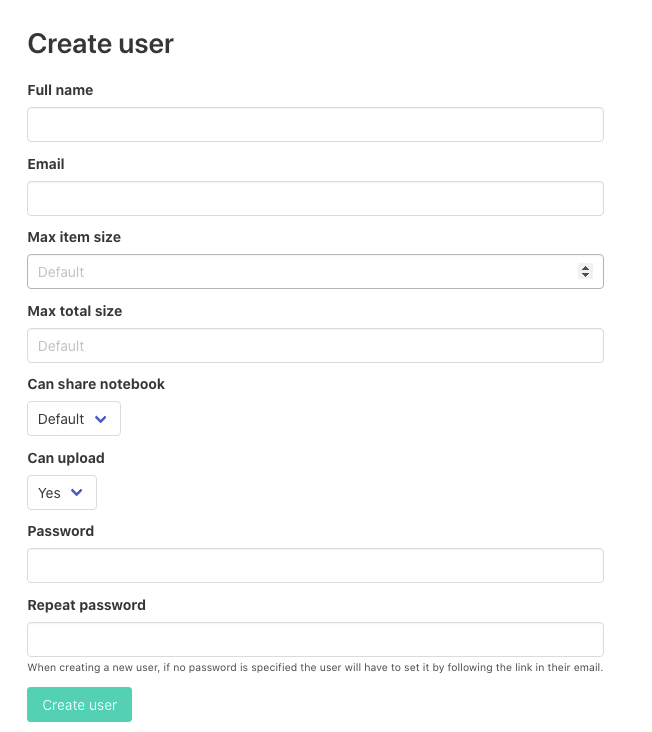
6. Go to Users and select Add User to create a new non-admin account for syncing with your Joplin Client.
7. Fill out the user details and click Create User to finish adding the new account.
To stop the server:
docker-compose down
To restart after changes:
docker-compose up -d --force-recreate
To check logs:
sudo docker-compose logs -f
Conclusion
Setting up your Joplin Server with Docker needs fine-tuning, but indeed, it is a great way to take your note-taking experiences with full control over your data. Thus, we can say with complete assurance that you have indeed learned to:
- Install Docker and Docker Compose on Ubuntu.
- Run the Joplin Server with Docker Compose.
- Make Nginx a reverse proxy for easy access.
- Protect your Joplin Server with Let’s Encrypt SSL.
Now, you can freely sync your notes between devices using the Joplin application while ensuring privacy, security, and reliability. With consistent updates and backups, the self-hosted Joplin Server will continue to serve as a powerful personalized or team-based note-taking solution.
Hosting Joplin on your server will offer you greater customization. This makes it ideal for privacy-conscious individuals or businesses seeking a secure self-hosted note-taking solution.
FAQs
Can I use a database other than PostgreSQL?
PostgreSQL is the officially supported database for the Joplin Server. Other databases may require extra configurations and aren’t supported in the official documentation.
How do you update the Joplin Server to the latest version?
Update using the Joplin Directory and run the following command!
sudo docker-compose pull
sudo docker-compose up -d
As a result, it will pull the latest image and restart the server.
Is it necessary to use Nginx as a reverse proxy?
No, Nginx helps with SSL termination while letting it handle incoming traffic more efficiently.
Is it possible to work without Docker?
Yes, though it makes deployment way easier and accommodates a more controlled environment.
How to Backup the Joplin Server?
Hopefully, one will routinely take backups of their PostgreSQL data directory, which resides in /opt/joplin/data/postgres, to avoid data loss.