(Leech Protect) – What is it and How to Set It Up in cPanel?
When you’ve worked hard to create useful content that is restricted for paying members on your website – with online courses, premium articles, digital products, and internal resources on even less restrictive sites – you do not want to deal with a lack of access control. Unfortunately, it doesn’t take much to share user login credentials; as a result, you will always have multiple unauthorized users with access to secured portions of your site. This is known as leeching, and it can wreak havoc on your site and its content, among other things.
If your website is hosted with a cPanel, you have a built-in tool that helps counteract this – Leech Protect!
Let me explain all about Leech Protect, why it’s important, and how to set it up in just a few simple steps.
What Is Leech Protect in cPanel?
Leech Protect is a feature in cPanel that gives you the ability to help prevent unauthorized access to your security-protected areas of your website on your cPanel account by limiting access logins in a short period of time. This is how it works:
- You protect a directory with a username and password.
- Leech Protect monitors how often users are logging in with those credentials.
- If someone tries to use the same login multiple times (or shares it publicly) and that login is accessed more than a set limit (e.g., 5 times in 2 hours), Leech Protect will flag it as leeching.
Once leeching is detected, you can:
- Automatically disable the compromised account
- Redirect the user to a specific URL or warning page
- Receive email notifications so you can take action
It’s an essential line of defense if your website deals with subscription-based content, client portals, or internal access areas.
Why Use Leech Protect?
Most people don’t realize how easily login credentials can spread—through forums, social media, group chats, or even by accident. One password can end up being used by dozens of people, costing you bandwidth, server resources, and potentially lost revenue.
Here are some common risks without Leech Protect:
- Revenue leakage: If one paying user shares their login, you lose money.
- Server strain: Multiple simultaneous logins from a single account can overload your site.
- Security threats: Repeated logins might indicate hacking attempts.
- Lack of accountability: You won’t know who’s really using your site.
Leech Protect helps you:
- Maintain control over your content
- Reduce unauthorized access
- Get alerted when abuse happens
- Automatically take action when login rules are broken
To Set Up Leech Protect in cPanel (Step-by-Step)
Let’s take a look at how you can enable and use Leech Protect in cPanel on your site. No advanced tech skills needed!
Step 1: Log in to Your cPanel
1. Go to your hosting provider’s cPanel login page. This is usually something like: https://yourdomain.com/cpanel
2. Enter your username and password to log in.
Step 2: Find the “Leech Protection” Tool
Once you’re inside cPanel:
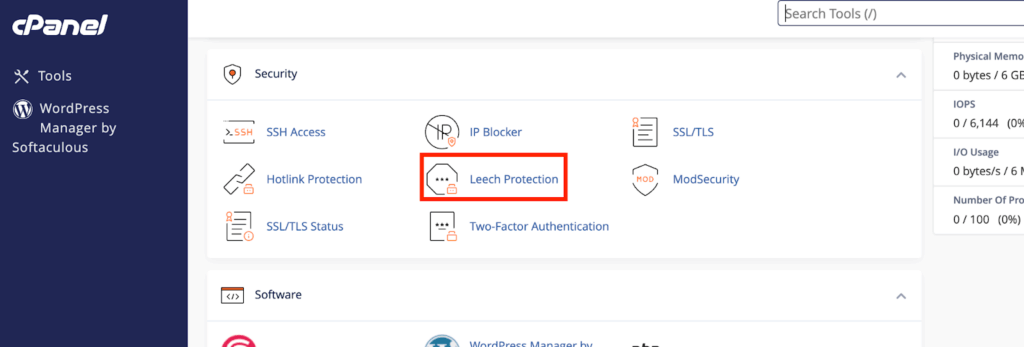
- Scroll down to the Security section.
- Click on Leech Protection.
This will open a directory browser showing the folders in your web hosting account.
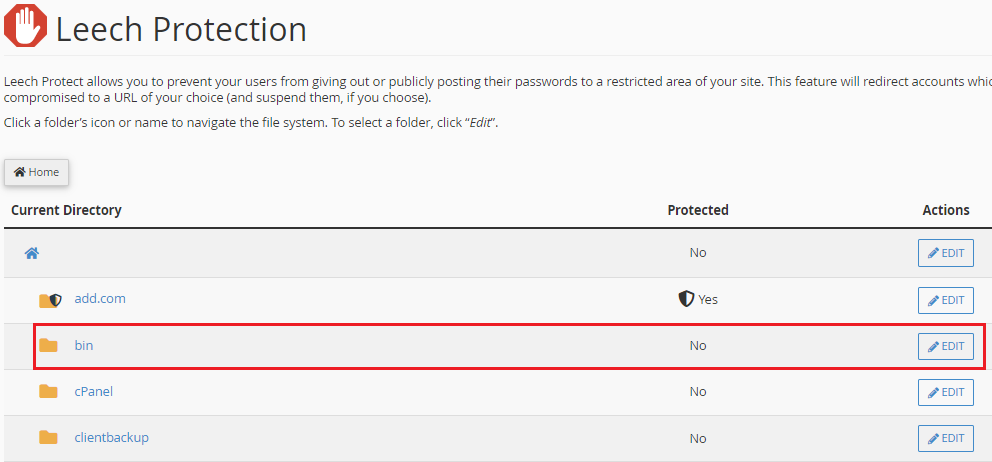
Step 3: Choose the Directory You Want to Protect
Leech Protection only works on password-protected directories, so confirm that the directory you want to protect is password protected (you can accomplish this with the “Directory Privacy” option in cPanel).
- Navigate to the folder you want to secure (e.g., /members, /downloads, etc.).
- Click on the directory name (not the folder icon).
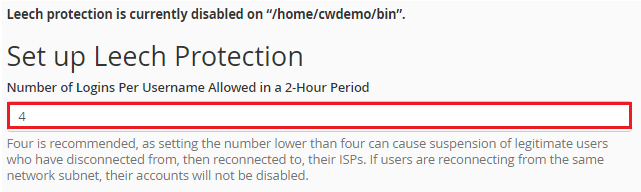
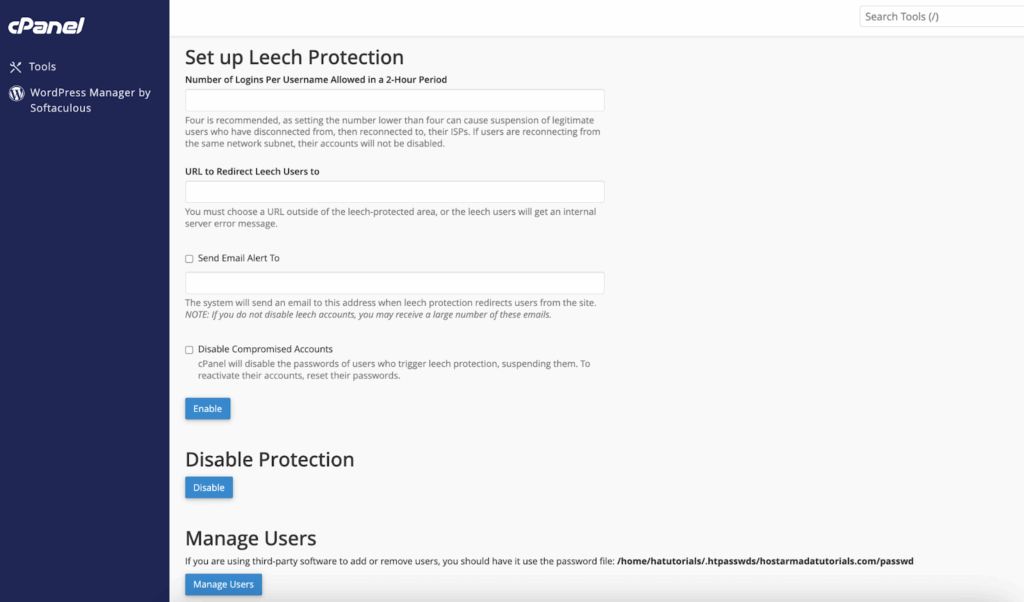
Step 4: Configure Leech Protection Settings
Once inside, you’ll see several configuration options:
Set the Login Limit
- Define how many times a user can log in within a 2-hour window.
- For example: 4 logins in 2 hours.
If someone exceeds this, Leech Protect kicks in.
Enable Account Disabling
- Automatically disable the user account that exceeded the login limit.
- Helps stop abuse in its tracks without manual intervention.

Redirect to a URL
- Set a custom URL where users are redirected if Leeching is detected.
- You might create a page like /access-revoked.html or /warning.html with a friendly (or firm) explanation.

Send Email Notifications
- Add your email address to receive alerts whenever Leech Protect is triggered.
- This keeps you in the loop so you can follow up if needed.

Step 5: Click “Enable” to Activate
Once you’ve set everything up, hit the “Enable” button.

And that’s it—Leech Protect is now actively monitoring that directory!
Want to Disable Leech Protect?
No problem. You can turn it off anytime:
- Go back to Leech Protection in cPanel.
- Navigate to the directory.
- Click “Disable”.
Be aware of and monitor anything strange if you choose to disable it.
Leech Protect Usage Pro Tips
- Test your settings first – Create a user account (test user) and simulate multiple logins to test your settings and make sure everything is working correctly.
- Balance usability and security – Implement strict login settings, but ones that are still usable for real users.
- Pair with strong passwords – Leech Protect works best when users are not using weak or guessable passwords.
- Use with Directory Privacy – Make sure the directory is protected by a username/password before applying Leech Protect.
Summary: Key Features of Leech Protect
| Feature | Description |
| Login Limits | Restrict number of logins per user in 2 hours |
| Email Alerts | Get notified if leeching activity is detected |
| Account Disabling | Automatically suspend compromised accounts |
| Redirection URL | Send violators to a warning or custom page |
| Easy Setup via cPanel | No code required — manage everything through cPanel interface |
Final Thoughts
If your website has restricted or premium content, enabling Leech Protect in cPanel is a smart move. It’s so easy to set up, runs in the background, and provides an added security measure against those unauthorized users sharing credentials or login information.
By reducing abuse, disabling compromised accounts, and keeping you notified with alerts, Leech Protect helps you preserve your website integrity, limits content erosion, and provides legitimate users a better experience.
So if you don’t have it set up yet, what are you waiting for?
Frequently Asked Questions (FAQs)
What does Leech Protect actually protect against?
Leech Protect guards against unauthorized sharing of login credentials for password-protected directories on your website. It ensures that a single user account cannot be used multiple times (often by different people) to access restricted content by setting a limit on login frequency.
Do I need to protect the directory with a password before using Leech Protect?
Yes. Leech Protect only works on directories that have been password-protected using cPanel’s Directory Privacy tool. If the directory isn’t protected by a username and password, Leech Protect cannot monitor login activity.
What happens when Leech Protect is triggered?
If someone has logged in too many times, the system will assume there is a Leech, which could be caused by a third user or the same user trying to log in. For example, if a user logs into a website 5 times in a 2-hour period, multiple logins from one user can be considered a Leech.
- The user account is disabled (if enabled in settings).
- The visitor is redirected to a custom URL.
- The site admin receives an email notification.
Will it block legitimate users if they forget their password and try logging in multiple times?
Yes, if a user keeps exceeding the login limit, they will be identified as having exceeded the limit. This is a crucial feature of the plug-in, which is beneficial, so again, avoid excessively low limits (if you choose to use it) of 1-5 attempts in an hour or 2 hours. Using 5-10 attempts in an hour or 2 hours prevents accidentally locking out legitimate users due to forgotten passwords or technical issues while protecting your content from unauthorized access.
Can I customize the warning page when a user is flagged?
Yes! You can build a custom HTML warning or error page, upload it to your site, and add its URL in the Leech Protect Redirect settings section. When redirecting the user, take this opportunity to explain why they were redirected, and offer ideas on what they can do next (usually related to their access permission issue).
Is Leech Protect part of all cPanel-hosting plans?
Because Leech Protect is a standard cPanel feature, it will be available on most shared, VPS, and dedicated cPanel-holding plans. But if you do not find it on your dashboard, verify with your hosting provider.
How do I re-enable an account that was disabled due to Leech Protect?
You will need to manually re-enable the user through your htpasswd file or through your hosting control panel, depending on how your directory is secured. You can ask your web host to help you.
Can I monitor multiple directories with Leech Protect?
Yes, but you’ll need to configure Leech Protect separately for each directory. It does not apply globally; you must activate and customize it per folder.
Does Leech Protect work for WordPress logins or WooCommerce accounts?
No. Leech Protect only works on cPanel-level, directory-based login protection (via HTTP authentication). It does not monitor WordPress or other CMS-specific login forms. For CMS-level protection, consider plugins or firewalls.