How to Install Let’s Encrypt with IIS on Windows Server 2019?
Introduction
A secure website is absolutely necessary. SSL certificates play a big role in this by encrypting the data shared between your website and its visitors. You can easily get a free and trusted SSL/TLS certificate from Let’s Encrypt for your Windows Server 2019 with IIS.
Let’s start securing your Website with Let’s Encrypt SSL on Windows Server 2019 (IIS)
Prerequisites
First, make sure your Windows Server 2019 is ready and active. Deploy your server and set up your domain on a VPS Server or Dedicated Server (if you are using the same).
You must also do a few other basic things –
- Connect to your server as an Administrator using RDP (Remote Desktop Protocol).
- Point your domain to your server’s IP address using an A Record.
- Disable Internet Explorer Enhanced Security. You will need to use a browser that works comfortably on the server, and this setting often blocks basic access.
Now, let’s start building a secure website.
Step 1: Install IIS (Internet Information Services)
- Click on your Start menu and open
Server Manager. - From there, go to
Add Roles and Features. - A wizard will open, from there choose
Role-based or feature-based installationand select your server from the list. - Scroll and find
Web Server (IIS)underServer Roles. Tick it. You can also add some optional features if needed. - Click
Installand wait till it finishes. - After installation, open a browser on the server and enter your server’s public IP like this:
http://your-ip-address
- You should see the default IIS welcome page. That means IIS is working perfectly.
Step 2: Create a Simple Web App
Here, we will create a very basic website just to make sure everything is working fine.
- Go to your
C:drive and open the folder path:C:\inetpub. - Inside that, create a new folder and name it with your domain name, for example, example.com.
- Press
Windows + R, typenotepad, and hit Enter.
In Notepad, copy and paste this simple HTML code:
<html>
  <head>
    <title>Cantech Hosting</title>
  </head>
  <body>
    <h1>Hello World!</h1>
  </body>
</html>
- Save the file with the name
index.htmlinside the folder you just created.
Step 3: Connect Your Domain to IIS
- Click on Start menu and search for
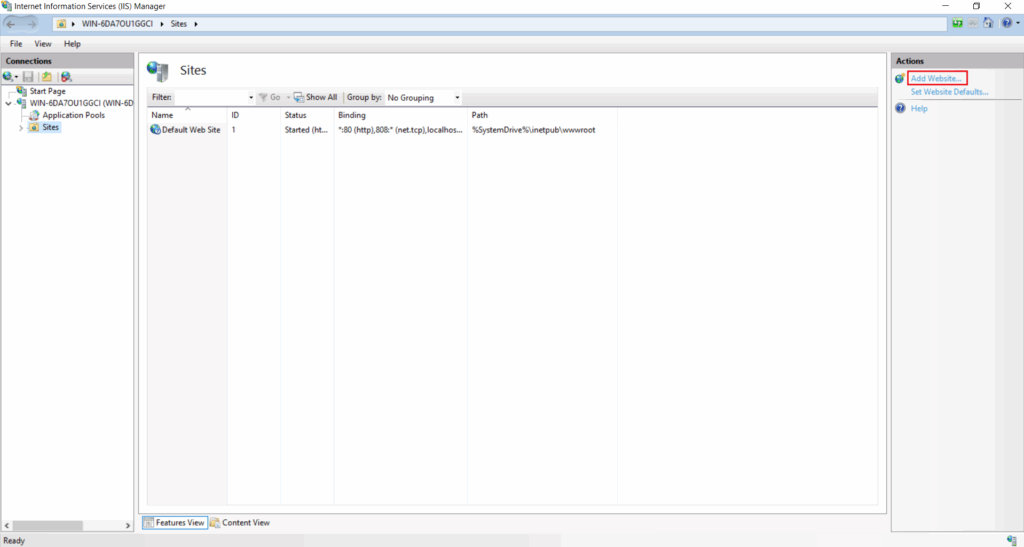
IIS Managerand open it. - On the left side, you will see your server name. Click the arrow beside it and then expand Sites.
- Now, on the right side, click
Add Website.
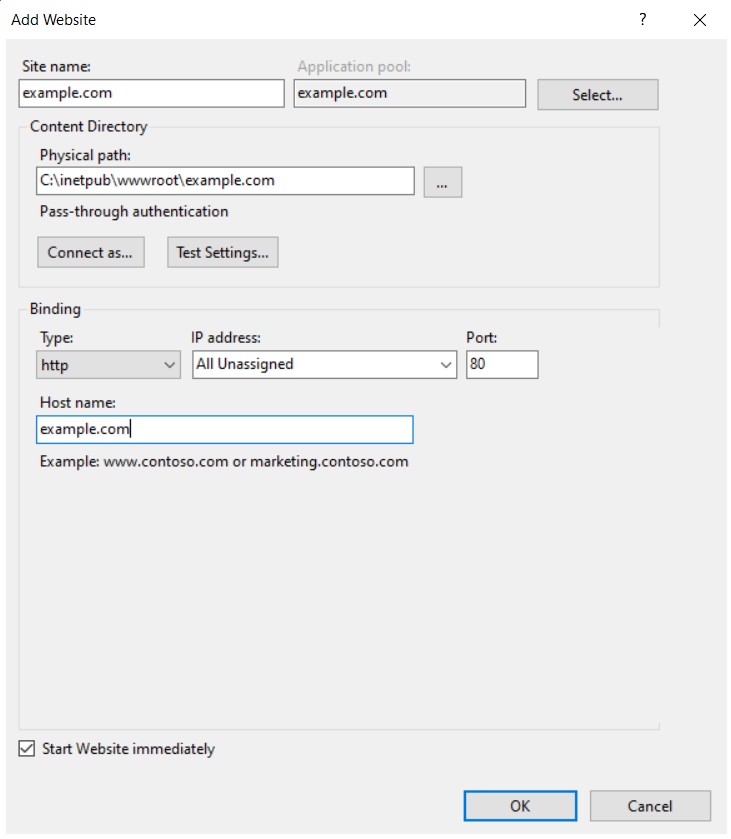
- Give your site a name in the
Site Namebox. It can be anything. - For the Physical Path, browse and select the folder where you saved your
index.html. - Leave the Type as
httpand the port as80. - In the Hostname field, enter your domain name (
example.com). - Click
OK.
- Now, open a browser and go to your domain name.
http://example.com
- If all steps are right, you should see the “Hello World!” message.
Step 4: Get Your Free SSL Certificate
Let’s Encrypt gives you a free SSL/TLS certificate which is trusted by all browsers. It makes your website secure using HTTPS. There are two easy tools to get this certificate. You can use either Certbot or Win-acme. We will explore both here.
Option A: Use Certbot
- First, Download Certbot for Windows from their official website.
- Run the setup file and install it.
- Now open
PowerShell as Administrator. - Type the following command. Replace example.com with your domain and give your real email:
certbot -d example.com -m [email protected] --agree-tos --webroot
- It will ask for the path where your website files are stored. Give the full path to your folder
C:\Certbot\live\example.com
- Certbot will create the SSL certificate and save it as
.pemfiles. But IIS doesn’t use.pem. We must convert it to.pfx. - So now,
install OpenSSLfor Windows from a trusted link. - Open PowerShell > folder where OpenSSL is installed in the
bindirectory.
cd "C:\Program Files\OpenSSL-Win64\bin"
- Now run this command to convert your SSL certificate into the
.pfxfile format:
.\openssl.exe pkcs12 -export
-out C:\Certbot\live\example.com\certificate.pfx
-inkey C:\Certbot\live\example.com\privkey.pem
-in C:\Certbot\live\example.com\fullchain.pem
- You will need to set a password for your certificate file.
- After that, open
IIS Manageragain. Double clickServer Certificates. - Click
Import, browse to your.pfxfile, and enter the password. - Now go to your
Sites, and clickBindings. - Click
Add. Choosehttpsas the type, and set the port to443. - Tick Require Server Name Indication.
- Select the certificate you imported from the dropdown.
- Click OK. Your site now supports HTTPS!
- Visit
https://example.comand check if it’s secure.
Option B: Use Win-acme (Easier Method)
Win-acme is a simple Let’s Encrypt client that automatically installs SSL certificates in the IIS store and sets up HTTPS bindings for your site.
- Download
Win-acmefrom their official site and extract the zip file. - Open the
wacs.exefile. If Windows gives a SmartScreen warning, click More info and Run anyway. - You will see a terminal-style screen.
- Press
Nto create a new certificate. - Select your site from the list.
- Choose the option with the press
Ato use all bindings. - Press
Yto agree to all prompts, and enter your email when asked. - Win-acme will do everything automatically. It will also save the certificate in the correct format and connect it with IIS.
- Check your site again by visiting
https://example.com.
Step 5: Redirect HTTP Requests to HTTPS
We want all visitors Use the IIS URL Rewrite module to automatically go to the secure version of the site.
Set up the URL Rewrite Module
- Download and install the URL Rewrite module for IIS.
- Open
IIS Manager, go to your site, and double-clickURL Rewrite.
Add a Redirect Rule in IIS
- In IIS Manager, open your server node and choose your website listed under Sites.
- Click
Add Rules, and selectBlank Rule. - Name the rule anything like.,
Redirect to HTTPS. - In the
Patternbox, enter(.*).
Set a Condition
- Go to Conditions and click Add.
- Set the input as
{HTTPS} - Keep the option Check if input string
matches the patternselected. - Set pattern as
^OFF$.
Set the Redirect Action
- For the Action type, choose
Redirect. - In the
Redirect URL, enter:
https://{HTTP_HOST}{REQUEST_URI}
- Uncheck
Append query string. Set the redirect type toPermanent (301). - Apply the changes.
Now, if anyone visits http://example.com, it will take them to https://example.com.
In case, this is not working, check your site’s root folder for a file named web.config. If it is missing, create a new one in Notepad and paste this:
<?xml version="1.0" encoding="UTF-8"?>
<configuration>
   <system.webServer>
      <rewrite>
         <rules>
             <rule name="HTTP to HTTPS" patternSyntax="ECMAScript" stopProcessing="true">
                 <match url="(.*)" />
                 <conditions>
                     <add input="{HTTPS}" pattern="^OFF$" />
                 </conditions>
                 <action type="Redirect" url="https://{HTTP_HOST}{REQUEST_URI}" appendQueryString="false" />
             </rule>
        </rules>
      </rewrite>
   </system.webServer>
</configuration>
- Save and test again.
Conclusion
Let’s Encrypt SSL is now installed on your Windows Server 2019 using IIS. Your site is secure and trusted by all browsers. Also, it will now serve content over HTTPS, and your visitors can browse without any warnings.