How to Blacklist a Domain in Plesk?
Are you frustrated with the unwanted spam emails invading your inbox or junk folder?
Do not worry, you’re not alone!
Blacklisting domains in Plesk can be very simple and effective tool in your toolbox for keeping things organized and managed.
This tutorial will cover the need to blacklist, how to blacklist in Plesk effectively, and best practice recommendations. Let’s get started!
Why Do You Require to Blacklist a Domain?
There’s nothing worse than drinking your morning coffee, and scrolling through your emails! Another spam-filled email from a random domain trying to sell you “the next best thing”, or worse, trying to phish you for your details.
This is where blacklisting a domain is helpful. It tells the server, “Hey, if anything comes into my server from this domain, just kick it into the void.”
Here are a few of the reasons to blacklist a domain:
- Block unwanted marketing emails or aggressive spamming.
- Block phishing activity, and suspicious or strange emails.
- Increase server performance by reducing spam.
Steps to Blacklist a Domain in Plesk
Let’s go through the basic steps to blacklist a domain in Plesk!
Step 1: Sign in to Plesk
The foremost step to blacklist a domain in Plesk is to sign into Plesk. This is where all of the action takes place. Move to the Plesk dashboard and sign in with your Plesk admin credentials.
If you manage multiple domains, double-check to select the proper one on your dashboard.
Then, choose Tools & Settings from the navigation menu.
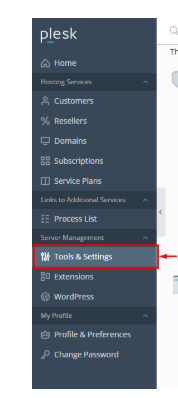
Step 2: Navigate to the Mail Section
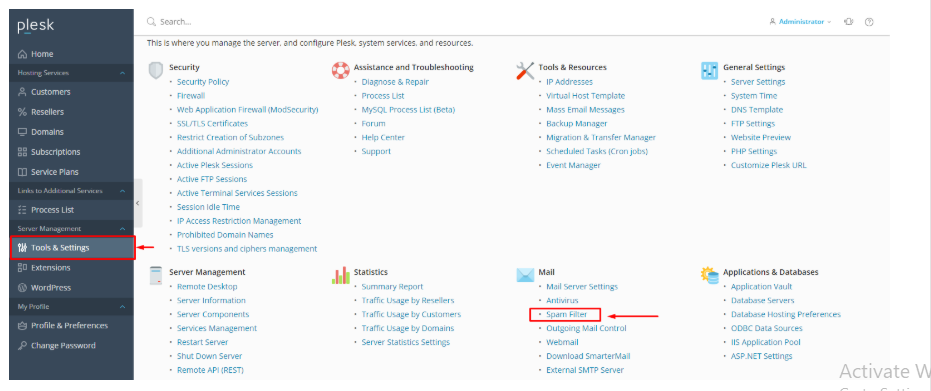
Now that you’re in:
Select Mail and click on Spam Filter.
Now, open the Blacklist tab and click on Tools > Add Domain.
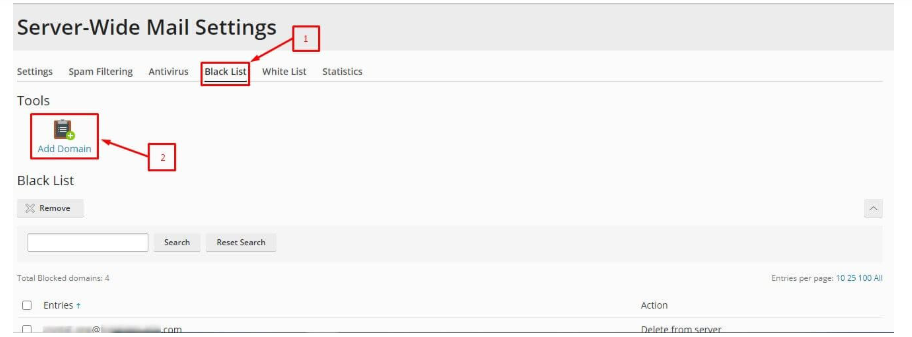
Step 3: Blacklist the domain.
Before blacklisting anything, make sure that you’ve turned on your spam filter.
Enter the email address in the text box that you want to blacklist.
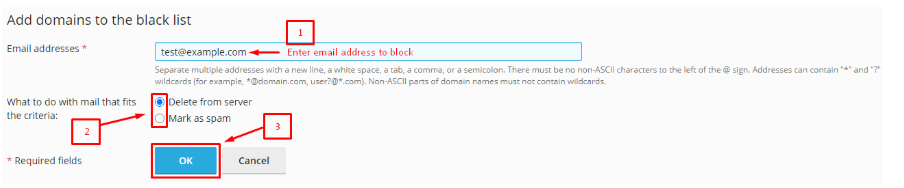
Thus, it will block all the emails coming from that domain.
Additionally, you can choose either radio buttons like what to do with mails received from that domain.
Finally, click “Ok” to apply the changes.
That’s it!
Best Practices for Domain Blacklisting
Here are a few quick tips to only help you to keep your blacklist working effectively, while avoiding blocking any important emails:
Use Wildcards: Using the * symbol can block every email from a specific domain.
Review Timely: Check your blacklist from time to time. You may find that you have a lot of closed or unnecessary entries that would be cleaned up.
Whitelist Trusted Domains: To block something important, you can whitelist trusted domains in the White List section.
Conclusion
By blacklisting a domain using Plesk, you can easily clean up your inbox. Whether dealing with a consistent spammer or who can approach you with emails, you now know how to stop unwanted domains quickly!
Frequently Asked Questions
What happens to emails from blacklisted domains?
Emails will likely be marked as spam or fully rejected, depending on your Plesk settings.
Can I blacklist a domain again later?
Yes! Just return to the Blacklist section and delete the domain entirely.
Is there a limit to how many domains I can blacklist?
Not really, but try to keep things organized so that you do not create unnecessary clutter or could create confusion in later identifying rejected domains.